


You own a putter, a short game that has stopped improving, and a slab of concrete out back that mostly holds a grill. That slab is one of the best head starts a patio putting green could ask for. Yes, you can build a green that rolls true on a patio, balcony, or rooftop. The hard, stable surface you already have replaces the digging and base compaction that eat up most of a backyard build.
What concrete can’t do is drain water or soften impact, and the whole project comes down to covering those two gaps. One question decides how: is your patio uncovered, taking rain and sun, or fully covered?
Quick Answer: Which Setup Does Your Patio Need?
| Your patio | Build this |
| Uncovered patio, balcony, or rooftop | Outdoor-rated, UV-stable turf with a non-absorbent backing (TFD Birdie Putt Elite is the lead pick), laid on TFD Professional Panel tiles and ballasted with TFD Silica Sand Infill. |
| Fully covered patio | TFD Golf Sim Pro for a clean, quiet 9 to 10 Stimp roll with no sand. Put a moisture barrier underneath if the concrete sweats. Want to chip too? Use an infilled turf instead. |
Already know your patio type? Jump straight to putting green options for your patio.
From bare slab to true roll, you’ll find:
- The right setup for your patio, covered or uncovered
- A six-step build, from slab check to finishing details
- A simple method for tuning green speed with infill
- A maintenance routine that keeps the roll true for years
Key Takeaways
- Yes, a patio makes an excellent green. A sound concrete or paver slab already supplies the stable, compacted base that most backyard builds spend their labor creating.
- One decision drives every material choice. If rain can reach the green, build it so water leaves fast; if it can’t, build for comfort, quiet, and a dry base.
- Uncovered patios, balconies, and rooftops: UV-stable TFD Birdie Putt Elite on TFD Professional Panel, ballasted with 1 to 2 pounds of silica sand per square foot. On decks and roofs, confirm the load rating and where runoff goes first.
- Covered patios: TFD Golf Sim Pro for putting only, laid on a dry slab or a foam barrier. Run a plastic-sheet moisture test first, because patios are rarely poured over a vapor retarder. Choose an infilled turf if you also want to chip.
- Most failures start in prep, not turf. Check the slab for cracks and dips, keep the patio’s drainage slope, and aim for no gap over 1/8 inch under a 10-foot straightedge where you putt.
- Infill sets your speed. More sand gives a faster roll, less sand a slower one; test-putt after every top-up.
- A few minutes a week keeps it true. Brush weekly, top up infill as it drifts, and inspect edges, seams, and drainage monthly.
Why Your Patio Is the Secret Weapon Your Short Game Has Been Waiting For
The Patio Putting Green Advantage: Turning Dead Hardscape Into a Practice Sanctuary
Every backyard putting green begins with a shovel. Installers strip the sod, haul in crushed aggregate, and compact it layer by layer until it won’t shift underfoot. That base decides whether a green stays true for a decade or ripples after its first wet winter, and it’s where most of the labor goes.
A sound concrete or paver patio has already done that work. It’s stable, compacted, and graded to shed water. You skip the excavation, the gravel delivery, and the rented plate compactor, and spend your effort on the surface instead.
Then there’s the practice math. A green ten steps from the back door turns 10 spare minutes before work into 30 putts. Built with clean edges and a proper sub-base, it also reads as a designed outdoor feature rather than a weekend experiment.
| Factor | Backyard build | Patio build |
| Excavation | Required | None |
| Base material | Crushed aggregate, several inches deep | Your existing slab or pavers |
| Compaction | Plate compactor, in layers | Already done |
| Time | Longer, base work dominates | Shorter, prep focuses on the surface |
| Drainage | Water soaks down through the base into soil | Water sheds via slope, drainage panel, and edges |
Debunking the “Cheap Rug” Fear: What Separates a Pro-Grade Green From a Gimmick
The fear is fair. Plenty of patio greens end up as a green rug that ripples in the wind and rolls like carpet. Look at why they failed, though, and the turf is rarely the culprit. The usual causes are turf laid straight on the slab with water trapped underneath, no infill (so the ball bounces and the edges lift), and seams that kick putts offline. Most patio greens fail at the prep stage, not the turf.
A decorative overlay is laid for how it looks. A performance surface is built for how the ball behaves, and the difference runs through every layer.
| Aspect | Rug | Real green |
| Backing | Thin and absorbent | Non-absorbent, or cushioned for covered use |
| Sub-base | Bare slab | Drainage panel or moisture barrier |
| Drainage | Water trapped underneath | Water leaves via slope, edges, and panel |
| Infill | None | Silica sand, tuned for speed |
| Seams | Visible ridges | Flat, with the grain matched |
| Edges | Curl and lift | Secured and finished |
A well-made patio green gives you a true roll, a speed you choose, break if you contour it, and chips that check up if you use infill. It won’t give you the footprint of a real green, lag putts longer than your patio, or grain that changes as a natural green dries through the afternoon. For the putts that decide scores, the ones inside 10 feet, that trade runs heavily in your favor. Even PGA Tour players make only about half their putts from just under 8 feet, according to Mark Broadie’s ShotLink analysis.
Space Is Not the Limitation You Think: Planning Your Layout
How much space do you need for a patio putting green? You need less room than you’d expect. About 6 x 10 feet handles straight 3- to 8-foot putts to a single cup. About 10 x 15 feet lets you reach that cup from several angles and distances, which is where practice starts to feel like a round.
Let the turf roll set the plan. TFD Birdie Putt Elite, TFD Putting Elite, and TFD Two-Tone Putt come in 15-foot-wide rolls, and TFD Golf Sim Pro comes in 12- or 15-foot widths. Keep the green no wider than one roll and you’ll have no side seams to fight. L-shaped and wraparound patios usually need one seam, so put it where you rarely putt across it. Our guide on how to measure and order turf walks through the sizing.
For an outdoor build, the panel module handles the rest of the math. Each 30 x 30-inch TFD Professional Panel covers 5.44 usable square feet once interlocked, so divide your area by 5.44 and round up. A 15 x 20-foot green (300 square feet) takes 56 panels, plus a few spares for cuts.
Place cups with purpose:
- Keep each cup at least 2 to 3 feet from any edge so a firm miss stays on the green.
- Spread two or three cups so one standing spot gives you 3-, 6-, and 10-foot-plus putts.
- Set one cup near the high side of the slope for uphill and downhill reads.
A patio 25 feet or longer opens up lag practice, and a strip of fringe along one side gives you somewhere to chip from.
Once the space is mapped, one question decides every material you’ll buy: is the patio covered or open to the sky?
Covered or Uncovered? The One Decision That Shapes Your Patio Putting Green
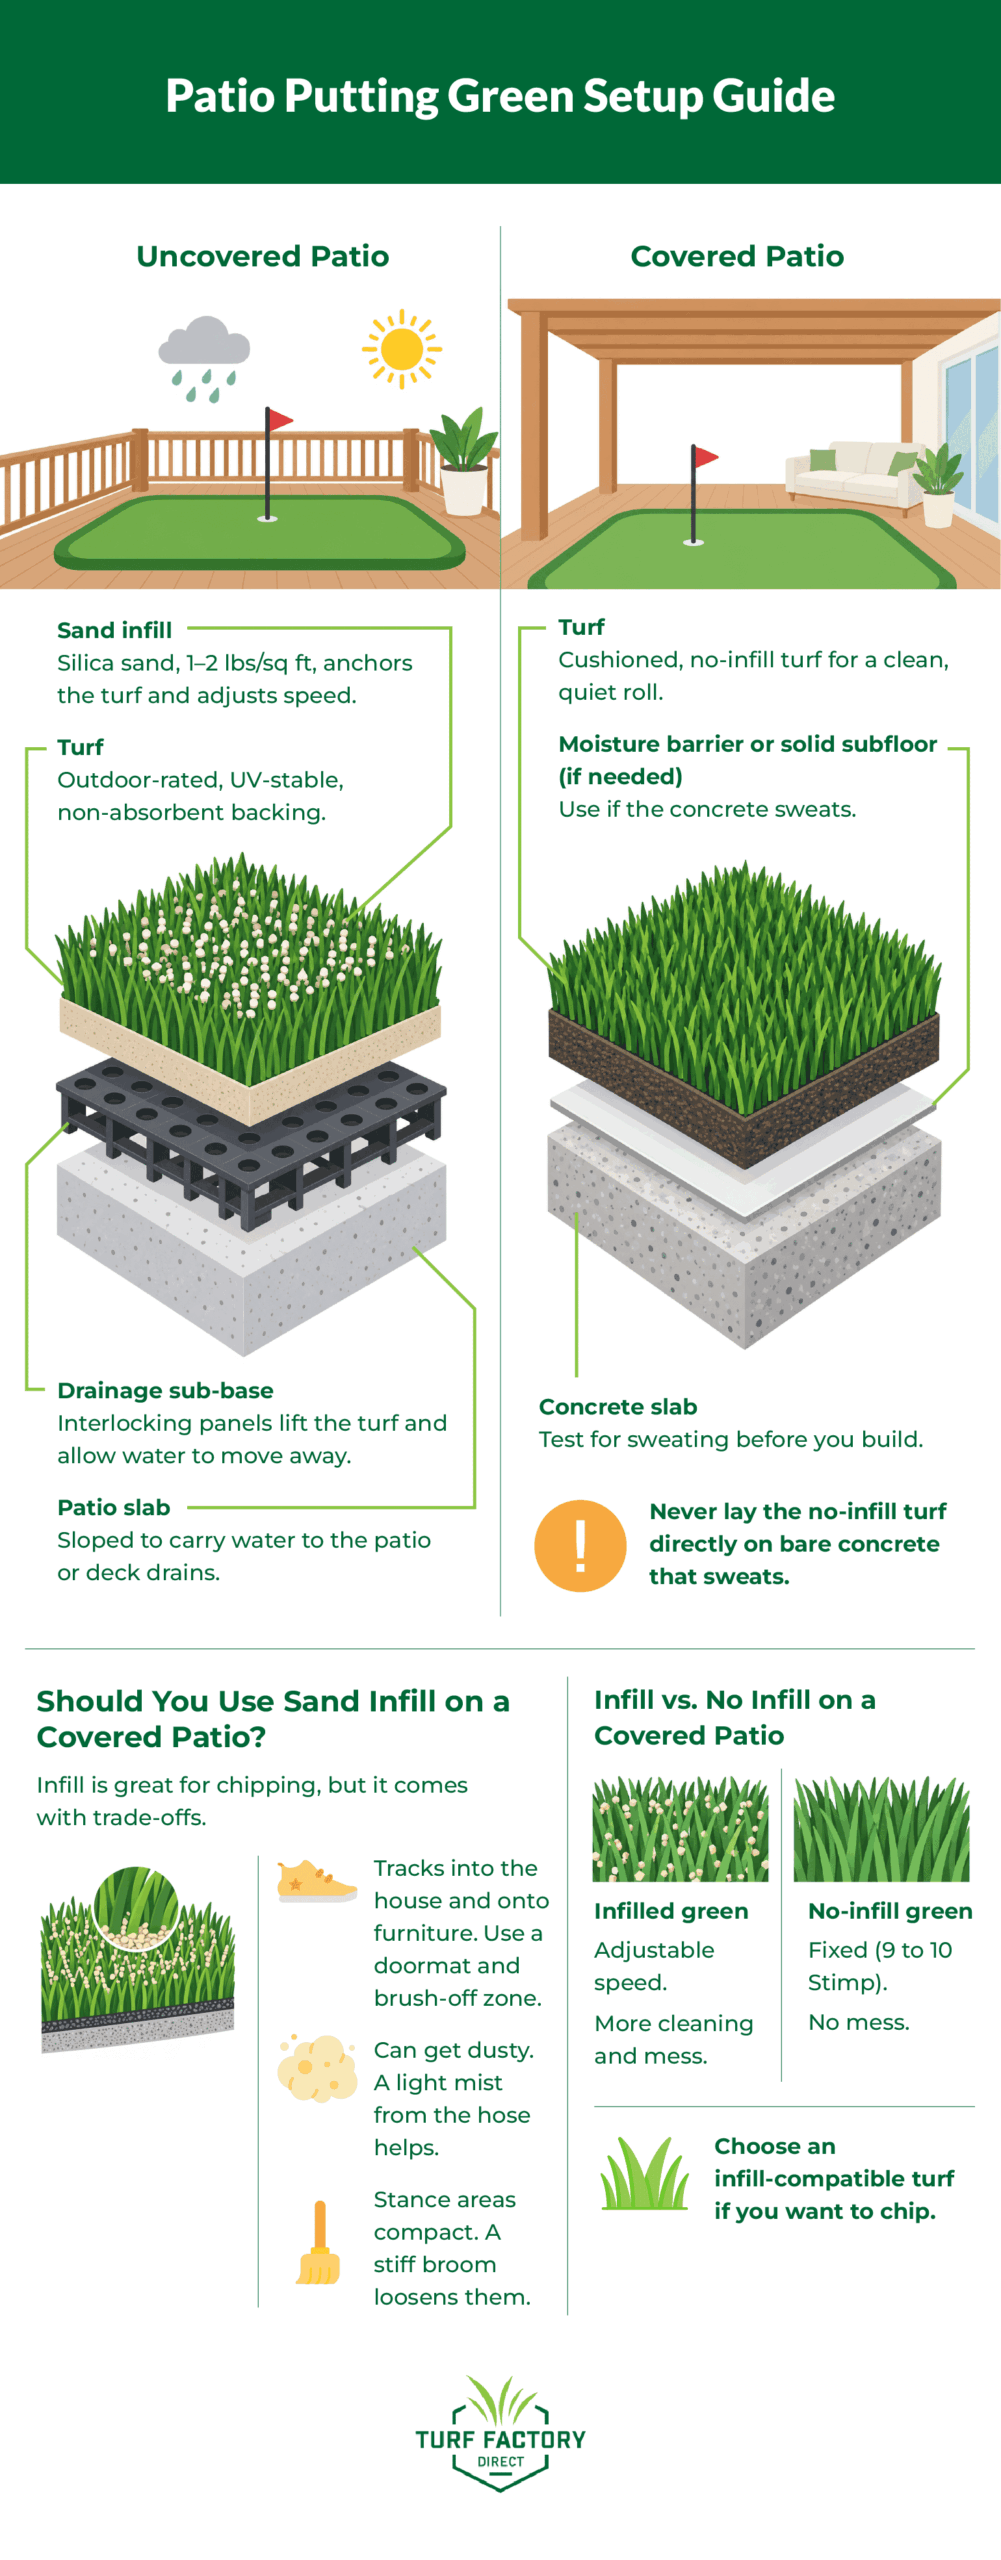
Look up. If rain can reach the green, build it so water leaves fast. If it can’t, build for comfort and a dry base. That single observation sorts out your turf, backing, sub-base, infill, and maintenance.
Uncovered Patios, Balconies, and Rooftops: Beating Rain and Sun
Out in the open, two things work against a green: standing water and sunlight. Concrete won’t absorb rain, so water trapped under the turf sits against the backing and breeds mildew. UV light breaks down fibers that aren’t stabilized against it, leaving them faded and brittle. In one sports-surface laboratory study, polypropylene turf fibers lost more than half their tensile strength after 2,500 hours of accelerated UV exposure.
On an uncovered patio, water must leave the putting surface quickly, either through the turf or off its edges, and nothing under the turf should hold moisture. That takes a non-absorbent backing, a sub-base that moves water, and a patio slope that carries it away. The system that delivers all three:
- Turf: TFD Birdie Putt Elite is the lead pick. It’s UV stabilized and rated for patios, balconies, and rooftops; it drains off its edges and is built for sand infill. TFD Putting Elite and TFD Two-Tone Putt are alternatives.
- Sub-base: TFD Professional Panel, interlocking tiles that lift the turf off the slab. Their open cells carry away any water that gets underneath, at a rate of 341 inches per hour, and barbs on top grip the turf backing.
- Ballast: TFD Silica Sand Infill at 1 to 2 pounds per square foot anchors the turf against wind and lets you tune speed.
A rooftop putting green or balcony putting green needs three extra checks. First, load: a finished outdoor build adds roughly 3 to 4 pounds per square foot, about 2 of that from the panels alone. That sounds small next to the 40 pounds per square foot that IRC Table R301.5 sets as the minimum live load for exterior balconies and decks, but that allowance already has to cover people and furniture, and older decks vary. Confirm the deck’s load rating with your building manager, HOA, or a structural engineer before you order. Second, runoff: make sure water reaches the deck’s own drains rather than the balcony below. Third, keep the roof membrane and its drains clear; laboratory testing of roof drains found that even a small amount of debris substantially cuts their flow. On an exposed roof, the sand’s weight earns its keep every windy afternoon.
Covered Patio Putting Greens: Prioritizing Comfort, Quiet, and Easy Cleaning
Under a solid roof that also blocks sideways rain, water doesn’t need to pass through the turf at all. That frees a covered patio putting green to focus on quiet, comfort, and nothing tracked into the house.
TFD Golf Sim Pro fits that brief. An attached 5mm foam cushion deadens ball bounce and footstep noise. The turf rolls at 9 to 10 on the Stimp scale (a standard measure of green speed), takes no infill, and cleans like an indoor rug with a vacuum or carpet cleaner.
The hidden risk sits under your feet. Building codes exempt patios from the plastic vapor retarder they require beneath indoor floor slabs (IRC R506.2.3), so many patios are poured without one, and ground moisture can rise through the concrete even when rain never touches it. Foam backing on bare, unsealed concrete traps that moisture. The U.S. EPA advises drying wet materials within 24 to 48 hours to prevent mold; foam on a damp slab may never dry, and over months the dampness can lead to mold, mildew, or foam breakdown.
Test the slab before you buy. This quick check is adapted from the ASTM D4263 plastic-sheet method, which building-enclosure consultants treat as an indicator rather than a precise measurement:
- Tape an 18 x 18-inch square of clear plastic sheeting tightly to the slab on all four sides.
- Leave it for at least 16 hours, ideally 24, during the season when the patio is usually damp.
- Lift it. Droplets underneath or a darkened patch of concrete means the slab sweats.
If it sweats, you have two fixes. Option A is a solid subfloor of 1/2-inch XPS foam board or solid foam flooring tiles, which gives a flat, dry base and the truest roll. Option B applies if the patio still gets wet from blowing rain or runoff: treat it as uncovered and build the outdoor system. Never lay TFD Golf Sim Pro directly on bare concrete that sweats.
Should You Use Sand Infill on a Covered Patio?
If you want to chip as well as putt, infill is one of the most realistic ways to practice chips on a patio: the sand absorbs impact, so the ball checks up the way it does on a real green instead of bouncing off cushioned turf. It also lets you tune speed and adds 1 to 2 pounds per square foot of ballast.
Under a roof, though, the trade-offs are harder to ignore:
- Sand tracks into the house and onto furniture. A doormat and a brush-off zone at the edge help.
- With no rain to settle it, dry sand gets dusty. A light mist from the hose keeps it down.
- Stance areas compact over time. A stiff broom loosens them.
If infill is the plan, choose an infill-compatible turf such as TFD Birdie Putt Elite, not TFD Golf Sim Pro.
| On a covered patio | Infilled green | No-infill cushioned green |
| Chipping | Ball checks up | Ball bounces |
| Speed control | Adjustable | Fixed (9 to 10 Stimp) |
| Mess | Sand tracking and dust | None |
| Cleaning | Brush and top up | Vacuum |
| Noise | Moderate | Quiet |
Patio Putting Green Setups at a Glance
| Patio type | Recommended turf | Sub-base | Infill | Key watch-out |
| Uncovered / rooftop / balcony | TFD Birdie Putt Elite (alternatives: TFD Putting Elite, TFD Two-Tone Putt) | TFD Professional Panel | TFD Silica Sand Infill, 1 to 2 lbs/sq ft | Water flow, UV exposure, deck load on rooftops |
| Covered, putting only | TFD Golf Sim Pro | Dry sealed slab, or XPS / solid foam barrier | None | Sweating concrete |
| Covered, putting plus chipping | Infill-compatible turf (e.g., TFD Birdie Putt Elite) | TFD Professional Panel or solid barrier | TFD Silica Sand Infill | Sand tracking and dust |
Found your setup? Compare putting green options for your patio.
Whichever setup fits your patio, the build follows the same six steps, and every one of them starts with the slab.
The Engineering Blueprint: How to Build a Patio Putting Green That Rolls True
On a patio, the ground is already there; six steps turn it into a putting surface. Steps 1, 3, 5, and 6 apply to every build. Step 2 matters most on uncovered patios, and Step 4 is optional.
- Assessing your existing hardscape
- Managing drainage
- Leveling the surface
- Contouring break (optional)
- Selecting turf and infill
- Adding the finishing details
Step 1: Assessing Your Existing Hardscape
Why it matters: every flaw in the slab shows up in the roll, so find it now while it’s cheap to fix.
Before you lay a putting green on concrete or pavers, run three quick tests:
- Water test: Hose the patio down, wait 20 to 30 minutes, and chalk around anything still puddled. Those are your dips.
- Straightedge: Lay a 10-foot straight board across the slab in several directions and mark any gap deeper than 1/8 inch.
- Level: Set a 4-foot level on the slab, raise the low end until the bubble centers, and measure the gap. Divide by 4 for slope in inches per foot.
Expect that last test to show a slope. Federal building guidance calls for patios to fall at least 1/4 inch per foot (2%) away from the house, though many existing patios have less, closer to 1/8 inch, because that fall is how they shed water. The slope is a feature to work with, not a flaw to remove. On the finished green it becomes a gentle, predictable break, and its direction tells you which way putts will drift and where water will leave. On paver patios, re-set rocking or sunken pavers and refill washed-out joints before anything else goes down.
| Condition | What to look for | Fix or proceed |
| Hairline cracks | Thin, stable, level on both sides | Proceed. |
| Wide or offset cracks | Over 1/4 inch, or one side higher (InterNACHI threshold) | Repair first; call a concrete pro if the slab is moving. |
| Low spots | Puddles after the water test, gaps over 1/8 inch under a 10-foot straightedge | Fill in Step 3. |
| Slope | About 1/8 to 1/4 inch per foot, consistent | Keep it; plan break and drainage around it. |
| Pavers | Rocking, sunken, or empty joints | Re-set and re-sand joints. |
| Surface | Crumbling or flaking | Resurface or patch before install. |
Not sure how many panels your layout needs? A TFD turf specialist can help with panel counts and sizing when you request a quote.
Step 2: Managing Putting Green Drainage on a Sealed Surface
Why it matters: water is one of the leading causes of early failure on a patio green, and concrete gives it nowhere to soak away.
Soil drinks rain; concrete doesn’t. Water trapped under the turf sits against the backing, breeds mildew, and in a heavy storm washes infill across the patio. Good putting green drainage on a sealed surface relies on three tools:
- The patio’s existing slope, which does most of the work.
- TFD Professional Panel, which lifts the turf on 1.25-inch cells and gives water a path underneath.
- Perimeter channel drains wherever water collects: against a wall, in a low corner, or on a patio with little fall.
On an edge-draining turf like TFD Birdie Putt Elite, most rain runs across the surface and off the low edge, and the panels handle what seeps in at the edges and through the infill. Their capacity isn’t the weak point. The panels drain 341 inches per hour. For comparison, in the first hour of Hurricane Harvey one Harris County gauge recorded 6.8 inches, a rate the Harris County Flood Control District put at roughly a 1,500-year event. You can look up heavy-rain figures for your area on the NOAA Precipitation Frequency Data Server.
The real question is where water goes after it leaves the green. Run a hose at the high side of the planned footprint and watch. The water should flow freely off the low edge to a drain, lawn, or gravel, not pool against the house or under furniture.
Common drainage mistakes, and their fixes:
- Damming the low edge with edging or planters: leave a gap or add a channel drain.
- Laying turf straight on the slab of an uncovered patio: use the panel sub-base.
- Flattening the slope during leveling: fill dips only.
- Aiming runoff at the house foundation: check the exit path before you build.
- Ignoring infill washout after big storms: brush sand back and top up.
On a covered patio this step is short. Sideways rain and rising slab moisture are the risks, so run the plastic-sheet moisture test and add a foam barrier if the slab sweats.
Step 3: Leveling the Surface for a True Roll
Why it matters: a putt that dies over a hidden dip teaches you the wrong read.
Patios are poured to shed water, not to roll a golf ball, so small dips, humps, and trowel ridges are normal. The goal is a surface that’s true, not flat. Keep the drainage slope; a consistent gentle pitch simply becomes break you can learn.
That changes how you measure. Stretch string lines, or set a laser, parallel to the patio’s existing slope rather than to true level. Measure down to the slab on a 2-foot grid. Spots below the line are dips to fill, and the gap tells you roughly how deep. Spots above it are high points to grind or feather around.
Aim for no gap over 1/8 inch under a 10-foot straightedge anywhere you’ll putt. That matches the flatness the tile industry sets for large-format tile, one of the strictest floor standards in common use. A ball is most sensitive in its last few feet, when it’s rolling slowest. A 20-foot putt also crosses twice the surface a 10-foot putt does, so small defects compound. On panel installs, the rigid 30 x 30-inch panels bridge minor texture, so compound work can target real dips and edges.
| Factor | Self-leveling compound (exterior-rated) | Polymer-modified patching mortar |
| Best for | Broad, shallow low areas | Local dips, crack edges, feathering |
| Depth range | Thin pours over wider areas | Feather edge up to deeper local fills |
| Finish | Smooth, flows toward level | Troweled; checked with a straightedge |
| Drawbacks | Needs primer and dams, can flatten a slope | Labor-intensive over large areas |
On a sloped slab, patching mortar is often the better tool, because self-leveling compound flows toward level, exactly what you don’t want across a whole patio. Either way, choose a product rated for exterior use. Then follow the manufacturer’s curing instructions to the letter: turf over uncured compound traps moisture, and rushed patches can shrink or crack, as Federal Highway Administration curing guidance warns of early drying, leaving a permanent defect under your green.
Step 4: Contouring Realistic Break With Foam
Advanced and optional. Why it matters: a dead-flat green only trains dead-flat putts, and real greens rarely are.
Closed-cell rigid foam lets you build permanent break on top of hardscape, and XPS foam board is the common choice. Pick a board rated around 25 psi compressive strength so it holds its shape under foot traffic and infill. Build up in 1/2-inch layers, feather the edges with a rasp, and bond layers with a foam-safe construction adhesive, since solvent-based adhesives can damage polystyrene.
Keep contours subtle. Golf-course industry guidance keeps cupping areas on real greens between 2 and 3% slope, and the faster the green, the less slope a cup can sit on before a ball won’t stop near it. On a small patio green, staying under about 2% around each cup keeps putts holdable. For scale, 2% rises about 2.4 inches over 10 feet. One main tilt plus one gentle ridge or swale, placed so each cup breaks differently, gives you plenty of reads.
- Sketch the green to scale on graph paper, including cups and contour lines.
- Mark the contours on the foam boards.
- Cut and layer the foam.
- Feather every transition smooth.
- Test-roll with the turf laid dry before fixing anything down.
On a covered patio, the XPS boards you lay as a moisture barrier can double as the contouring layer. On an uncovered panel build, ask a TFD turf specialist how contours should sit relative to the panels before you cut.
Step 5: Selecting Your Turf and Putting Green Infill
Why it matters: the turf sets the roll, and the infill sets the speed.
Your covered-or-uncovered decision has already narrowed the field. Four specs drive how a green putts:
- Pile height: how tall the fibers stand. Shorter and denser means a truer roll.
- Fiber type: nylon springs back from traffic; polypropylene is softer and well suited to sand infill.
- Weight: ounces of fiber per square yard. Nylon greens usually list face weight, while some infilled greens list total yarn weight, so compare like with like.
- Density: how tightly the fibers are packed.
Those specs are why artificial putting green turf differs from landscape or pet turf, which is tall and soft enough that a ball snakes and stops dead.
Speed is measured by the Stimp rating: a Stimpmeter is a 36-inch ramp that releases a ball onto the green, and the rating is the average distance, in feet, that several balls roll (USGA). A superintendent survey put typical everyday course speeds at 9.5 to 10.5, so a green in the 9 to 10 range plays like a normal course. With putting green infill, you set that number yourself. More sand buries the blades for a faster roll; less sand leaves more blade exposed and slows it down. Research on artificial sports pitches found the same pattern, with ball roll lengthening as free pile height dropped. Without infill, turf on hard concrete can feel stiff and bouncy, unless it’s a cushioned product like TFD Golf Sim Pro.
| Product | Fiber | Pile height | Weight | Backing | Infill | Best for |
| TFD Birdie Putt Elite | Polypropylene | 3/4 in | 45 oz yarn weight | 7 oz primary | Silica sand | Uncovered patio, rooftop |
| TFD Putting Elite | Texturized nylon | 7/16 in | 36 oz face weight | 28 oz natural rubber | Silica sand | Stable outdoor green |
| TFD Two-Tone Putt | Nylon | 7/16 in | 36 oz face weight | Rubberized action back | Silica sand | Natural two-tone look |
| TFD Golf Sim Pro | Nylon | 1/2 in total with pad | 32 oz | 5mm foam | None | Covered patios |
On a panel install, the panels’ barbs plus 1 to 2 pounds of sand per square foot hold the turf without full gluing; secure the perimeter as described in our step-by-step turf installation guide.
Seams are where many synthetic putting green installation mistakes show up. Lay every piece with the grain (the direction the fibers lean) running the same way, as institutional turf specifications also require, or you’ll see a color change and feel a speed change. Run seams parallel to your main putting line, keep them at least 2 to 3 feet from any cup, and butt edges tightly with no gap or overlap. A ridge across your line will steer the ball every time.
Step 6: Adding the Finishing Details
Why it matters: edges and cups are where a green looks professional or homemade.
A patio has no soil to anchor a cup, so plan cup placement on an outdoor build before the panels go down. On a covered Golf Sim Pro build, cup placement depends on the subfloor you chose, so plan it before the barrier goes down. Wherever cups go, keep them 2 to 3 feet from edges and seams.
A panel build sits roughly 1.25 inches plus pile above the patio, so finish that height change with a secured border or tapered edge that nobody catches a toe on. Trim cleanly around furniture and planters, and never block the low-side drainage exit. A fringe collar of slightly longer turf like the TFD Elite Fringe or TFD Supreme Fringe adds a small chipping green and makes the green look like it belongs on a course. For evening practice, mount low-voltage LED fixtures off the turf or recess them into the border.
Keep heat away from synthetic fibers. Grills, fire pits, and patio heaters can melt them, and so can sunlight reflected off nearby windows. Most synthetic turf melts at around 175 to 200°F, and heat reflected from energy-efficient Low-E glass can reach those temperatures.
Maintaining Your Green for Long-Term Performance
A synthetic green doesn’t need mowing or watering, but it does need a few minutes of attention each week. That small routine is what keeps the roll you built from drifting.
Brushing and Cleaning
Brush the green weekly with a stiff synthetic broom, working against the grain, to keep fibers upright and the roll consistent. Patios near trees collect leaves, pollen, and seed pods faster than you’d expect, and a leaf blower on low clears them without disturbing the infill. Covered, no-infill greens are the easier case: vacuum or carpet-clean them like an indoor rug.
Managing Infill and Green Speed
Infill drifts, and your speed drifts with it. Watch for one area rolling faster than another, blade tips poking up along footpaths, and sand collecting at the low edge after a storm. When you spot any of these, brush the sand back into place and top up with TFD Putting Green Top Dressing. After every top-up, hit a few test putts to confirm the speed is where you want it. On covered infilled greens, mist lightly to control dust and loosen compacted stance areas with a stiff broom.
Inspecting for Wear and Protecting Your Investment
Walk the green once a month and look for lifting edges, separating seams, compressed contours, pooling after rain, and heat marks near grills or windows. A lifting edge is a 10-minute fix today and a torn, curled edge next season.
Lifespan depends far more on care than on the calendar. A green that’s brushed, topped up, and kept dry underneath holds its roll for many years; one that’s left to mat down, lose its infill, or sit on trapped water wears out in a fraction of that time. The prep you did in Steps 1 to 3 pays off here, because a green that drains and lies true has far less to go wrong.
| Task | Uncovered green | Covered green | Frequency |
| Brush fibers | Yes | Yes (infilled greens) | Weekly |
| Clear debris | Yes | As needed | Weekly |
| Vacuum | No | Yes (no-infill greens) | Weekly |
| Check and top up infill | Yes, especially after storms | Yes (infilled greens) | Monthly |
| Mist for dust | No | Yes (infilled greens) | As needed |
| Inspect edges, seams, and drainage | Yes | Yes | Monthly |
Your Next Step: Build a Green That Rolls Like the Real Thing
A patio isn’t a compromise; it’s a head start. The slab already gives your patio putting green the stable, compacted base a backyard build has to dig for. All that’s left is to cover the two things concrete can’t do on its own: move water and soften impact. Decide whether the patio is covered or uncovered, then check the slab, keep water moving, and get the surface true. After that, the right setup is simple:
- Uncovered patio, balcony, or rooftop: TFD Birdie Putt Elite on TFD Professional Panel, ballasted with TFD Silica Sand Infill.
- Covered, putting only: TFD Golf Sim Pro over a dry slab or a foam barrier.
- Covered, putting plus chipping: an infilled turf such as TFD Birdie Putt Elite.
Get those choices right and the reward is the one you started with: a green ten steps from the back door, rolling true at a speed you chose, ready for the putts that decide your scores.
When you’re ready, compare putting green options for your patio. If you need assistance on sizing or panel counts, request a quote and a TFD turf specialist will help you plan it.