


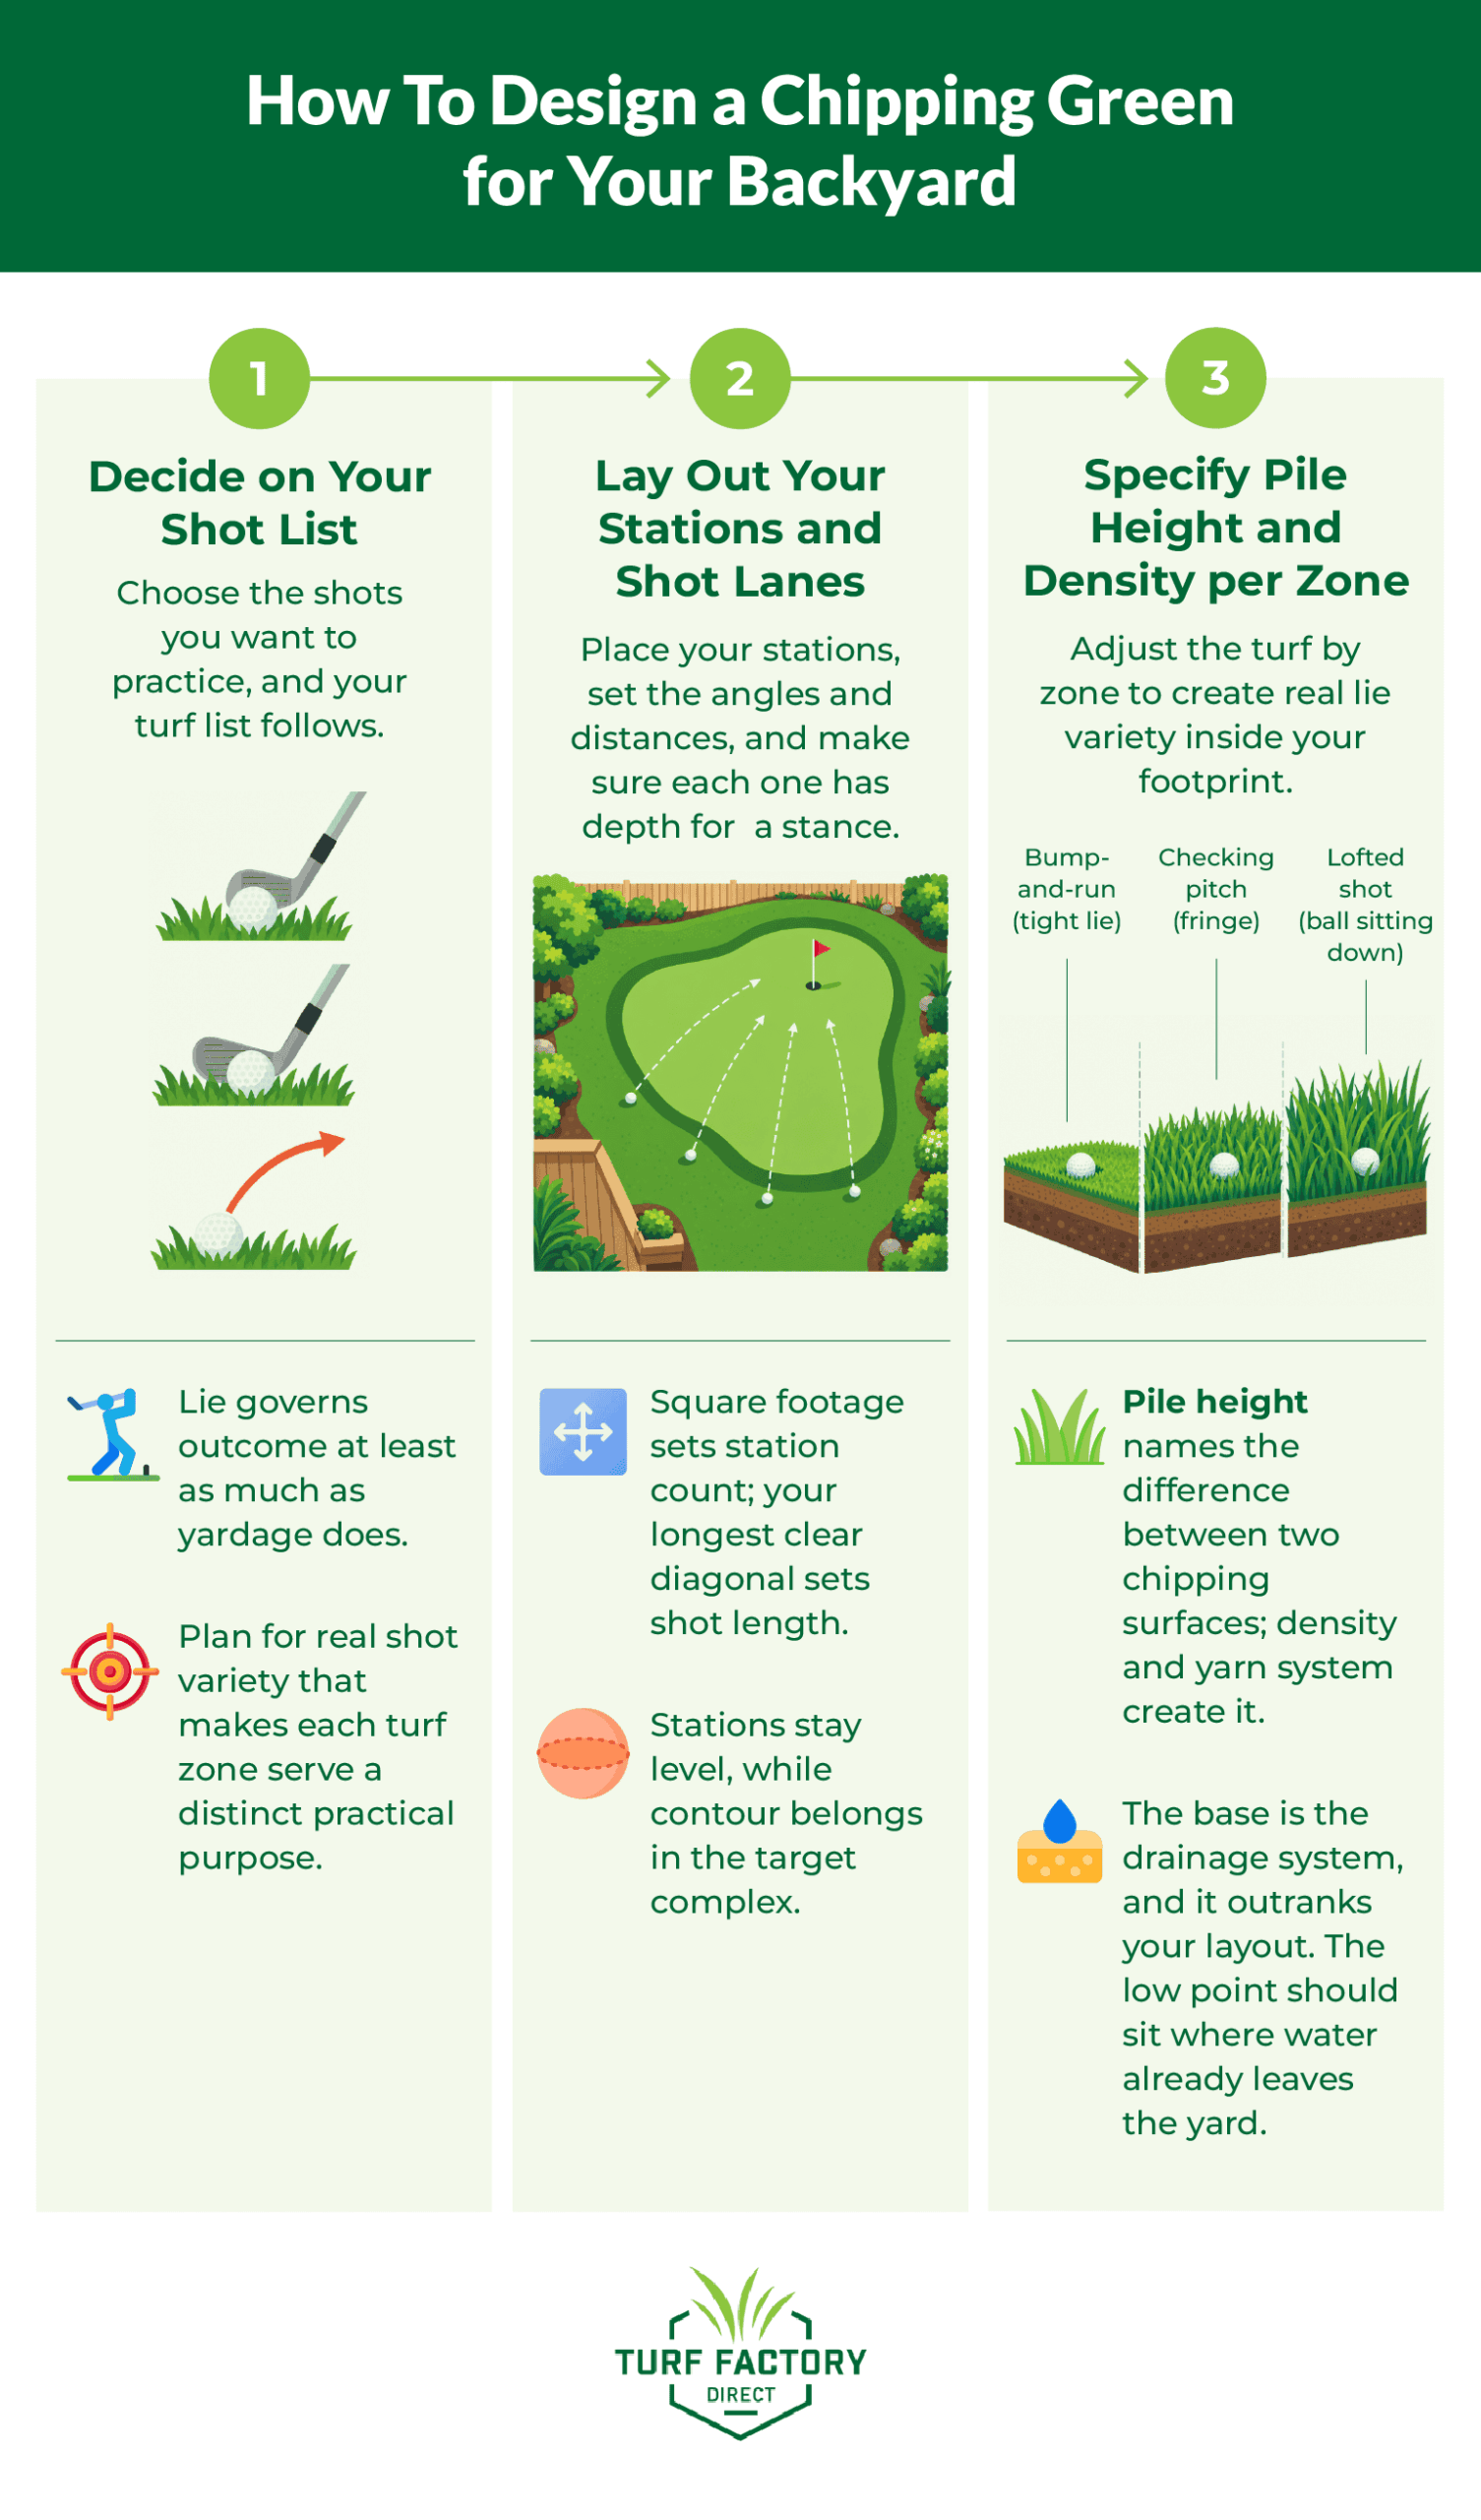
Designing a chipping green for your backyard is three decisions: Shot list first, then stations and lanes, then a pile height and density per zone. Design the surfaces you hit from, not just the one you hit at.
- Decide which shots you want to own. A bump-and-run off a tight lie, a checking pitch out of fringe, a lofted shot from a ball sitting down. Your shot list dictates your turf list.
- Lay out your stations and shot lanes. Where you stand, how far out, at what angle. This is where square footage actually gets spent.
- Specify pile height and density zone by zone. This is the mechanism. Different specifications in different zones are what produce real lie variety inside a fixed footprint.
| Decision | What it governs | Where it’s covered |
| Which shots you want to own | Every choice below it — turf, layout, budget | Defining the vision |
| Station and shot-lane layout | Square footage, angles, how many distinct shots you own | Reading your space |
| Pile height and density per zone | What the ball does when it lands | Engineering your turf zones |
Everything below is detail on those three decisions: how much room each one needs, and what the ball does when you get them right.
Planning a Chipping Green That Performs Like the Real Thing
Defining the Vision: Why a Chipping Green Beats a Flat Putting Surface
Watch a ball land on a flat putting surface from twenty feet out. One hop, a short roll, stop. Watch the next one. Same hop, same roll, same stop. That repeatability is a putting green doing exactly its job, and it is also the reason a putting green makes a poor place to practice chipping.
What a single-surface installation trains is not a chip. It is one rehearsal of one chip. Short-game skill lives almost entirely in reading a lie and adjusting to it — judging how much grass sits behind the ball, whether the leading edge can get under it, how much the shot will run once it lands. The size of that effect is measurable: from fifteen yards, PGA Tour players get up and down 69% of the time in the fairway and 51% in rough or sand — one yardage, two lies, an eighteen-point swing. Strip that variable away and what remains is a stroke. You can groove a stroke five hundred times and still stand over a ball nestled down in the collar, on a shot you have never made, with no idea what your wedge is about to do.
The point of a golf chipping green is to put those decisions back into practice. A short game practice area built with shot progression zones — a tight lie here, fringe there, a sitting-down lie on the far side, each at a different distance and angle — turns a practice session into a sequence of different problems rather than one problem repeated. That structure has been tested on the shot itself: twenty-four golfers chipped from three different ground lies, and the group that rotated between lies at random finished more accurate on a mixed retention test than the group that worked each lie in a block. One small study on novices, but the experimental variable was the lie. That is the part of short-game skill that shows up on a scorecard.
A surface that produces the same result every time is a putting green succeeding. For chipping, it is a practice area doing one shot’s worth of work.
The vision is bounded by the yard you already own, which is where the design work actually starts.
Reading Your Backyard Space: Size, Shape, and Layout Fundamentals
Take a tape measure to the yard before you take a pencil to paper. Usable area is not lot area — it is what remains after setbacks, tree canopy, the clearance a full wedge swing needs, and a safety margin behind every target. Then find the longest clear diagonal. That measurement, not the square footage, sets the longest shot you will ever hit out there.
Be honest about what those distances mean. Thirty yards is ninety feet of unobstructed lane. A generous 900-square-foot practice area, laid out at roughly thirty by thirty, supports a shot of about fourteen yards corner to corner. Chipping green size is a square-footage question; shot length is a lot-length question, and confusing the two is how people end up disappointed by a green that was built correctly.
| Tier | Usable area | Stations | Turf specifications | Targets | What you give up |
| Compact | Under ~400 sq ft | 1–2, at roughly 15–30 ft | One chipping specification | 1–2 | Angle variety — build the highest-value shot first |
| Standard suburban | ~400–900 sq ft | 2–3, at roughly 15, 30, and 45 ft | Both pile heights in play | 3 | Long-approach practice |
| Estate | ~1,000+ sq ft | Multiple, on multiple sides | Both specifications, plus slope or bunker features | 4+ | Little — build entertaining space into the plan |
Dimensional guidance here is for planning purposes. Confirm specifics against your own site conditions.
Two things this table does not say. First, a station does not have to sit on the green. The turf investment belongs in the surfaces that create the lie and in the target complex; a longer approach can be played off lawn or a portable mat at the far end of the yard. That single move buys most suburban lots a shot they assumed they could not have. Second, size each station for the stance, not for the ball. A zone one club-length deep gives you exactly one lie. What creates a second lie from the same spot is enough depth to stand behind the ball and move the ball two or three feet — which changes distance, angle, and how much surface sits behind the strike.
Backyard chipping green design also has a shape vocabulary. Shape does more work in a chipping green layout than most people expect:
| Shape | Suits | What it buys you |
| Kidney | Square or squarish lots | A concave side that opens two approach angles into one target |
| L-shape | Corner lots, side-yard runs | Two lanes at ninety degrees, sharing a single target complex |
| Hourglass or peanut | Long, narrow yards | Two distinct target areas at different distances along one axis |
| Perimeter-wrap | Yards with a fixed centerpiece — patio, pool, mature tree | Chipping surfaces on three sides of a target, maximum angle variety per square foot |
One practical note on shape. Chipping turf comes in fifteen-foot standard widths, sold in one-foot linear increments. A design whose zones nest inside that width uses material efficiently; long, irregular runs generate offcut you pay for and discard. That is not an argument for rectangles. It is an argument for knowing that shape and material efficiency are the same conversation.
Once you have matched your yard to a tier and a shape, the project stops being hypothetical. Tell us about your project — dimensions, the shots you want, where the ground falls — and we can talk through what fits.
With a footprint and a shape settled, the question becomes what happens inside them.
Designing for Realism: Contours, Slopes, and Strategic Cup Placement
Two stations and three cups is six shots on paper. In practice it is often two.
If both stations sit on the same turf specification, at similar distances, on the same side of the target, the golfer is playing one shot to three different lengths. That trains distance control and nothing else. Move those same two stations onto different specifications, at different distances, on different sides of the green, and the identical three cups now produce six shots that each demand a different club, a different landing point, and a different expectation of what happens after the ball lands. The cups did not change. The surfaces did.
Contour is what makes those landing points matter. Fall through the landing area and around the target means a shot released downslope runs out, while the same shot into an upslope checks up short. That forces you to pick a landing point rather than aim at the cup. Few habits transfer to the course more directly.
Slope under your feet does the opposite. A station on a grade changes your lie and your stance every time you shift position, and that is not variety — it is noise you cannot control for. Build contour into the target complex; keep the stations level.
Principles for chipping green contours and cup placement:
- Set cups at genuinely different distances from each station — a three-foot difference is not a different shot.
- Put at least one cup where the approach runs across a slope, not straight up or down it.
- Keep one cup tight to a fringe edge, so a slightly long shot is punished with a real recovery.
- Avoid the low point of the green for any permanent cup position — water and displaced infill both find it first.
- Rotate positions seasonally rather than adding more of them.
Contour and placement set up the shot. Turf specification decides what the ball does when it gets there, which is the heart of the design.
Engineering Your Turf Zones: Pile Height, Density, and Lie Variety
Set a ball on synthetic chipping turf at one inch of pile, then set one on turf at one and one-eighth. The gap is an eighth of an inch, and anyone doing that subtraction is right to ask whether an eighth of an inch can possibly change a golf shot.
On its own, it does not. Turf pile height is the headline number; density and yarn construction do most of the work. A dual yarn system places a secondary thatch yarn beneath the primary face yarn, and that denser lower layer is what actually holds the ball up off the base and what a leading edge has to travel through on the way in. A tri-color face yarn at one inch presents the ball closer to a firm surface with less material behind it. Pile height names the difference between two chipping surfaces. Density and yarn system create it.
That difference is what a wedge feels. On the tighter surface, there is very little between the ball and the base, so contact has to be clean — and bounce is why a fat strike is punished so severely. On maintained grass, a strike half an inch behind the ball is partly absorbed; the sole enters the turf and the shot comes out short but playable. Over a compacted synthetic base there is nothing to absorb it. The sole skips off the surface, the leading edge arrives at the ball’s equator, and the result runs across the green. The taller, denser surface restores some of that margin. Material behind the ball lets the leading edge travel through rather than skip, which is the same reason it accepts a lofted shot the tighter zone would reject.
Worth saying plainly, because the alternative is a claim that will not survive contact with your wedge: synthetic yarn does not grab a ball cover the way maintained bentgrass does, and no backyard surface reproduces tour-level spin. What genuinely varies between an artificial turf chipping green’s zones is how far the ball settles, how cleanly the leading edge reaches it, and therefore how the shot launches and how far it runs after it lands. Trajectory and release are the variables you are designing. Those are also the variables that decide most up-and-downs.
| Factors / Specifications | TFD Elite Fringe | TFD Supreme Fringe |
| Pile height | 1″ total | 1 1/8″ total |
| Yarn system | Tri-color yarn system | Dual yarn — primary face yarn plus secondary thatch yarn |
| Character | The tighter chipping surface | Reads as a robust field green |
| Backing | Dual backing | Dual backing |
| Roll | 15 ft standard width, 1 ft linear increments | 15 ft standard width, 1 ft linear increments |
| Plays like | Cleaner contact demanded, more release | Holds the ball up, lets a wedge slide under, suits lofted shots |
Full specifications for both surfaces are on the TFD Elite Fringe and TFD Supreme Fringe product pages.
There is a third specification most people never hear about, and it is the only one still adjustable after installation: infill. Infill depth relative to fringe turf pile height determines how much yarn stands exposed above it. More infill buries more yarn and the surface plays firmer and tighter; less infill leaves more yarn standing and the ball settles further in. Two zones cut from the same roll can be made to play differently by infill level alone. Sand-type infill is the norm on golf surfaces because it firms and stabilizes the yarn; the cushioned rubber infills used in landscape and field applications give under a wedge, which is the last thing a chipping surface should do.
Target surfaces are specified in the opposite direction — shorter, denser, tuned for roll rather than for how a club enters. That contrast is the point. Specification decisions hold up only as well as what sits beneath them, which is where the second half of the design starts.
Designing It to Last: Drainage, Budget, and Landscaping Decisions You Make Before You Build
Laying the Foundation: Base Layer and Drainage Constraints on Your Layout
Water passes through the turf backing almost immediately. It is the compacted aggregate underneath that has to carry it somewhere, and the subgrade beneath the aggregate determines whether it can. The base is the drainage system, and it outranks your layout.
Two consequences follow, and both are design decisions rather than construction details. First, the green’s low point should coincide with where water already leaves the yard. If the natural low point is exactly where you wanted a chipping station, one of the two has to move, and it will not be the water. Second, no cup position belongs at that low point, where standing water and migrating infill do their damage first.
The base itself is crushed aggregate, compacted in lifts to a consistent depth and graded to a steady fall rather than left flat. A geotextile membrane goes between subgrade and aggregate, and its job is separation — keeping soil fines from pumping up into the base and destroying its structure over several seasons. The effect is measurable: in lab testing under simulated traffic, fines migrating into the subbase reached 6.39% of subbase mass without a geotextile and 1.81% with one, and added fines of 8% were enough to disrupt an aggregate drainage layer. It is not a substitute for base drainage, though — the fabric stays permeable by specification — and treating it as one is a common and expensive misunderstanding. Inadequate planning here is a common cause of chipping green drainage failures, which surface as deformation and bubbling long after anyone connects the two.
Walk the yard after heavy rain and look for:
- Standing water more than a few hours after the rain stops
- Moss, algae, or persistently bare soil in one area
- Silt fans or washed-out mulch showing the direction water travels
- Downspouts discharging toward your intended footprint
- Existing hardscape that dams the natural fall
Where water goes determines where expertise earns its cost.
Weighing DIY Against Professional Installation: Where Expertise Protects Your Design
Excavation, base compaction, and drainage are where chipping green installation projects are won or lost, and they are also the phases with no second chance — a base that settles unevenly cannot be corrected without pulling the surface. Seaming, infill distribution, and cup setting reward experience but are recoverable. Edging, borders, and planting are genuinely DIY-manageable for most homeowners.
Budget is better understood as an allocation problem than a price question. At any level of spending, the order that protects practice quality is the same:
- Base and drainage. The only element that cannot be fixed later without demolition.
- Chipping surface square footage, and a second specification. This is where money buys practice quality, and it is the line most often cut first.
- Target complex and cup positions.
- Edging, borders, and decorative integration.
The cost that surprises people is access. Excavation spoil has to leave the property, and if a machine cannot reach the yard, that work happens by wheelbarrow — which can move the labor line further than any material decision in the project. Infill volume scales with area rather than ambition, and edging on tight curves costs more than edging on gentle ones. Check local requirements before you break ground; rules on drainage and hardscape vary by municipality.
Budget settled, the question becomes how the green sits in the yard as a whole.
Integrating the Landscape: Blending Chipping Zones Into Your Backyard
The fear is that a serious practice surface will read as equipment — a green rectangle where a garden used to be, visible from the kitchen window, permanently.
The answer is the same variation that produces the practice value. A single-surface installation is a flat plane of one color, and it does look installed. A multi-zone green is not: a tri-color face yarn beside a deeper field-green surface beside a shorter target creates tonal depth and visible edges, and the eye reads that as designed rather than deployed. It also lets you read your own zones at a glance from the far end of the yard.
From there the integration is ordinary landscape work. A defined border — steel edging, stone, or a planted bed — gives the green a deliberate boundary rather than a seam. Low ornamental grasses and shrubs at the perimeter soften the transition without entering shot lanes. Position seating and fire features on the side that faces the target complex rather than a station, so guests watch shots land instead of standing in a swing lane. A backyard chipping green that reads as landscape is the version that gets used and enjoyed rather than tolerated.
A well-integrated green still has to keep performing, which is the last design decision.
Maintaining Performance: Keeping Every Chipping Zone Course-Ready
Chipping zones wear differently than target surfaces do. A putting surface absorbs distributed foot traffic. A station absorbs repeated strikes into a small area from the same stance, which displaces infill and lays the yarn over in one direction — and the consequence is a design problem, not a housekeeping one. The lie you specified drifts. A zone that held the ball up on the day it went in sits it lower over a season of use unless the strike area is rotated and the yarn is brushed against its lay.
Different specifications drift differently. Taller, denser surfaces tend to mat first in the strike zone; tighter surfaces tend to show the same wear as infill displacement. Matting resists measurement — Penn State’s researchers report no accepted method beyond visual rating — so the check is your own eye, zone by zone. That makes chipping green maintenance a zone-by-zone job rather than a whole-green one.
| Interval | Task |
| Weekly, in season | Rotate the strike area within each station; clear debris. |
| Monthly | Cross-brush stations against the lay of the yarn. |
| Seasonally | Check infill depth in strike zones and top up; rotate cup positions. |
| Annually | Inspect seams, edges, and drainage fall after the wettest month. |
That is also the honest answer to how many zones to build. Every zone added is a zone maintained, and one station kept true is worth more than two left to drift. Which brings the design back to where it started.
Turning Your Design Into a Project
Three decisions, in order: the shots you want to own, where you stand to hit them, and what each surface is specified to do. The first two are drawn on paper. The third is what makes the first two real.
The lie is the practice. A backyard chipping green built around varied chipping surfaces gives back a different shot every session, and that compounds — while a single-surface green gives back the same one until you stop using it. The difference between one shot rehearsed five hundred times and five hundred that differ is not the size of the green. It is what you chose to stand on.
Once your zones and specifications are settled, the build itself is a separate subject, covered in detail in our guide to backyard chipping green ideas.
What to have ready before you get in touch:
- Usable dimensions and rough square footage
- The chip distances you want to practice
- Existing slope, and the direction water moves across the yard
- Site access for materials and equipment
- Which shots matter most to you
With those five things in hand, the conversation starts at design rather than at square one. Tell us about your project and get a quote.