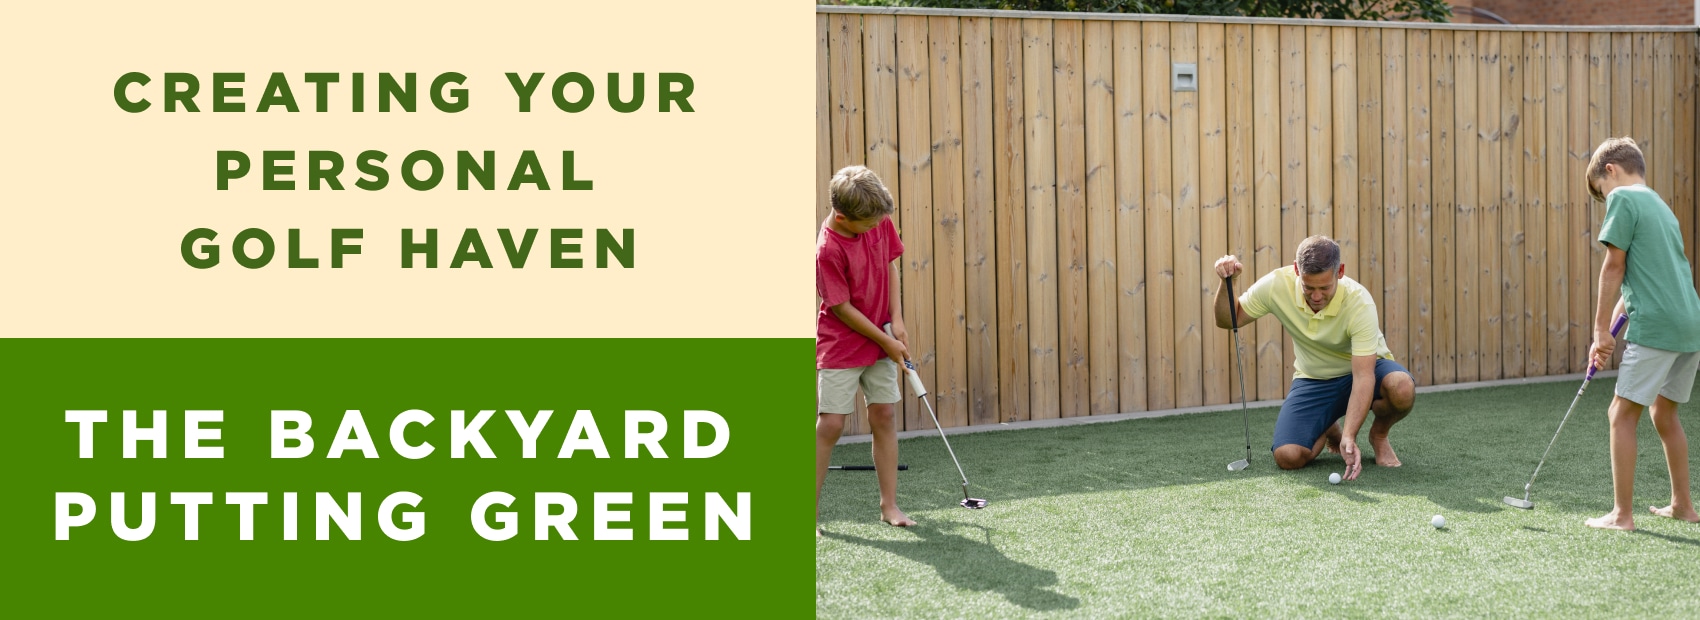
A great backyard putting green comes down to three things: a properly compacted aggregate base, quality synthetic turf, and drainage that moves water off the surface before it ever pools. Get those right, and you’ll have a golf putting green for your backyard that plays consistently for 15 years or more. Synthetic turf is the right choice for the vast majority of homeowners because it delivers reliable green speeds year-round without the grueling maintenance schedule that real bentgrass demands.
Key Takeaways
- Three fundamentals determine success: A compacted crushed-stone base, quality synthetic putting turf, and proper drainage grading (1–2% minimum slope) are the non-negotiable foundation of every durable backyard green.
- Synthetic turf is the clear winner for residential greens. It delivers consistent Stimpmeter speeds of 10–12 year-round, requires roughly 30 minutes of monthly maintenance, and lasts 15–20+ years — compared to 5–10+ hours of weekly upkeep for natural bentgrass.
- Base preparation is the most critical phase. A poorly compacted subbase causes settling, pooling, and inconsistent ball roll — and it’s the one mistake you can’t fix without starting over.
- Structured practice delivers measurable results. Short, focused sessions of 15–20 minutes, 3–4 times per week, improve putting performance faster than occasional casual play.
- Quality landscaping adds genuine home value. Well-designed outdoor features can increase perceived home value by 5%–12% according to industry research.
Whether you’re a 15-handicap looking to finally own your lag putting or you want a backyard centerpiece that makes every cookout more interesting, the planning principles are the same. For a broader overview of what’s possible, our backyard golf greens guide covers the full landscape.
It all starts with planning.
Planning Your Backyard Putting Green
The drainage that wasn’t graded. The turf that wasn’t spec’d for putting speed. The green that’s too small to practice anything meaningful. These are the mistakes that turn a $10,000 investment into a $10,000 regret, and they all happen before anyone breaks ground. The planning phase is where you prevent every one of them.
Assessing Your Backyard Space
You need less space than you think. A single-hole practice green fits comfortably in a 10×20-foot footprint — roughly 200 square feet — and that’s enough for serious putting practice from multiple angles. But if your yard allows it, the sweet spot is 500 to 1,500 square feet, which gives you room for multiple holes, varied putt lengths, and enough contour to simulate real on-course reads.
Here’s how available space translates to what you can build:
| Available Space | Green Type | Holes | Best For |
| 200–400 sq ft | Practice strip | 1 | Focused straight-putt repetition; tight yards |
| 500–800 sq ft | Standard green | 2–3 | Varied practice with breaking putts and lag distances |
| 1,000+ sq ft | Full practice complex | 3–5 | Complete short-game practice with chipping fringe |
Start by measuring the flattest, most accessible area of your yard — ideally within easy sight of the house. A green you can see from the kitchen window is a green you’ll actually use. Morning sun exposure helps keep the surface dry and reduces algae risk, but full shade isn’t a dealbreaker with synthetic turf the way it is with natural grass.
Before committing to a spot, check three things: existing drainage patterns (water needs to flow away from where the green will sit), proximity to large trees (root systems destabilize your base over time and drop debris constantly), and underground utilities. If your yard has a gentle natural slope, that’s actually an advantage — it simplifies drainage grading and gives you built-in contour for realistic breaking putts.
Once you know where the green goes and how big it can be, the next question shapes everything about its design: what do you actually want to practice?
Setting Goals for Practice and Play
The best backyard greens are built around specific practice goals, not a vague idea of “I want a putting green.” Whether you’re trying to tighten up your three-footers, develop distance control on 20-foot lag putts, or practice reading breaks, that decision shapes the green’s size, hole placement, contour, and even the turf you choose.
Three questions worth answering honestly before you sketch anything:
- What’s costing you strokes? If you’re three-putting from 25 feet, you need a green long enough for lag practice — at least 30 feet of rollable surface. If you’re missing inside five feet, a smaller green with multiple hole positions works.
- Do you want chipping practice? If yes, you’ll need a fringe area with taller turf (typically a different product) surrounding the putting surface. This adds 2–4 feet of border and opens up approach shots that a flat putting-only green can’t offer. For creative fringe setups, see these chipping green ideas.
- Is this for you, or for everyone? A competition-focused green for a serious golfer looks different from a family-friendly entertainment feature. Both are valid, but trying to serve both without planning for it usually means neither works well.
Plan for at least 2–3 holes. Single-hole greens get repetitive within weeks, and the marginal cost of adding a second or third cup is negligible compared to the practice variety they create. Place holes at different distances from natural approach points — a 6-foot putt, a 15-foot putt, and a 25-foot putt gives you a well-rounded session every time.
Your goals also determine contour. If you want to practice reading breaks, you’ll need designed undulations — subtle 1–3% slopes that create left-to-right and right-to-left movement. If pure stroke mechanics are the priority, a flatter surface with minimal break lets you focus on fundamentals. Most golfers benefit from a mix: one area of the green relatively flat, another with gentle movement.
With your practice goals defined, you’re ready for the biggest material decision: the surface itself.
Choosing Between Natural Grass and Synthetic Turf
For about 90% of homeowners building a backyard putting green, synthetic turf is the clear winner. That’s not a sales pitch — it’s the math. A natural bentgrass green demands the same maintenance intensity as a country club’s grounds crew delivers daily, and most homeowners dramatically underestimate what that actually looks like at 6 a.m. on a Tuesday.
Here’s the honest comparison:
| Factor | Natural Grass (Bentgrass) | Synthetic Turf |
| Maintenance time | 5–10+ hours/week during growing season | ~30 minutes/month |
| Annual maintenance cost | $2,000–$5,000+ (fertilizer, irrigation, pest/disease control, equipment) | $200–$500 (infill top-up, occasional cleaning supplies) |
| Green speed consistency | Varies daily with weather, mowing height, growth rate | Consistent 10–12 on the Stimpmeter year-round |
| Durability/lifespan | Vulnerable to drought, frost, disease, traffic wear; requires annual overseeding | 15–20 years with basic care |
| Water usage | Thousands of gallons per month during warm seasons | Zero (occasional rinse for cleaning only) |
| Year-round playability | Dormant or dead in winter (most climates); muddy in rain | Playable 365 days, drains within minutes |
| Installation timeline | 6–12 months to establish from seed or sod | Playable within days of installation |
| Winter appearance | Brown, dormant, or covered | Green and consistent |
One term you’ll see throughout this guide: the Stimpmeter is the standard device used to measure green speed. You roll a ball down a calibrated ramp and measure how far it travels. Tournament-grade greens typically register 12.0 or higher, sometimes exceeding 13.0 at championship events like the Masters. Quality synthetic putting turf consistently delivers 10–12, matching a well-maintained course green. Most residential natural grass greens, even with dedicated maintenance, fluctuate between 7 and 10 depending on season, recent mowing, and moisture. That inconsistency is the real problem — your reads at home don’t transfer to the course, so the practice value erodes.
Natural grass does have one legitimate advantage: feel. The slight give of real bentgrass underfoot, the way a well-maintained green catches morning light — there’s nothing quite like it. If you have the budget for a dedicated maintenance program (or genuinely enjoy greenkeeping as a hobby), a natural grass green can be extraordinary. But for most homeowners who want a green that performs reliably without becoming a second job, synthetic turf is the smarter investment.
For a deeper dive into what distinguishes different turf products, our backyard golf turf selection guide breaks down pile height, density, and fiber types. And if you want to see and feel the difference before committing, order putting green turf samples to compare quality firsthand.
With your surface material chosen, it’s time to design the green itself.
Designing the Layout, Contours, and Features
A perfectly flat putting green is boring within a month. The difference between a green you use daily and one that collects leaves comes down to contour — subtle undulations that make practice sessions feel different every time you step on the surface.
The goal is gentle, predictable movement that simulates real on-course reads. A 2% slope means a 2-inch rise over an 8-foot run — enough to move a ball noticeably on a fast surface, but not so dramatic that every putt becomes a guessing game. Err on the side of subtlety here. Overly aggressive contours are one of the most common DIY design mistakes, and they’re expensive to fix after installation because reshaping means tearing up turf and regrading the base.
Space your holes to create putts of varying lengths and break angles. A good three-hole layout might include one hole accessible from 4–6 feet (your confidence builder), one that requires a 12–15 foot approach with a gentle side slope (distance and read practice), and one at the far end of the green for 20–25 foot lag putts. The standard cup diameter is 4.25 inches — same as every regulation course per the USGA and R&A Rules of Golf, and cups should sit flush with the putting surface in a rigid sleeve that allows seasonal repositioning.
Around the putting surface, a 2–4 foot fringe border serves triple duty: it provides a visual transition to the surrounding landscape, creates a chipping practice area, and softens what would otherwise be a hard edge against mulch or lawn. Fringe turf is typically installed at 1.5–2 inches of pile height versus the putting surface’s 0.5-inch pile. For fringe and chipping area inspiration, explore these chipping green ideas.
Then there are the features that separate a functional green from a genuine backyard destination. A small sand bunker — even a 4×6-foot splash bunker — adds a practice element most home greens lack. Recessed LED lighting along the perimeter extends your practice window into evening hours and makes the green a focal point after dark. A flagstone border, built-in seating, or integration with an adjacent patio creates the kind of space that pulls people outside.
The best residential putting green designs feel like they grew out of the landscape rather than landed on it. Work with the natural lines of your yard, use border plantings that complement what’s already there, and think about sightlines from the house and primary living areas.
With your design sketched, the final planning question is the practical one — what will this actually cost?
Budgeting: What a Backyard Putting Green Actually Costs
A quality backyard putting green is one of the few backyard investments that returns value both in daily use and property appreciation. Where you land in that range depends on three variables: size, materials, and labor.
Here’s how costs break down across three common project tiers:
| Component | Budget/DIY (200–400 sq ft) | Mid-Range (500–800 sq ft) | Premium (1,000+ sq ft) |
| Synthetic turf | $1,200–$2,400 | $3,000–$5,600 | $6,000–$12,000+ |
| Base materials (crushed stone, sand, geotextile) | $400–$800 | $800–$1,500 | $1,500–$3,000 |
| Drainage (grading, perforated pipe if needed) | $200–$500 | $500–$1,200 | $1,000–$2,500 |
| Cups, flags, accessories | $100–$200 | $150–$300 | $200–$500 |
| Professional labor | $0 (DIY) | $2,000–$4,000 | $4,000–$8,000+ |
| Estimated total | $1,900–$3,900 | $6,450–$12,600 | $12,700–$26,000+ |
| Best for | Dedicated golfer, tight yard, handy homeowner | Most homeowners; balanced quality and value | Serious golfer or entertainer; showcase installation |
Turf is the single largest material cost, and quality varies enormously. Browse TFD putting green turf products to see the range of professional-grade options and what drives the price differences.
DIY vs. professional installation is a genuine tradeoff, not a clear-cut answer. DIY saves 30–50% on labor costs, but base preparation is the most critical and least forgiving phase of the entire build. If the subbase isn’t properly graded and compacted, you’ll see settling, drainage problems, and uneven ball roll within a year or two. Homeowners with construction or landscaping experience can absolutely handle a DIY install. If you’ve never operated a plate compactor, hiring a professional for at least the base work is money well spent.
The long-term math is worth running. The national average daily-fee greens fee sits at roughly $37 according to NGF data, though golfers at the premium courses this audience frequents typically pay $80 or more per round. At two rounds a month, that’s roughly $2,000 a year in greens fees alone. A mid-range backyard green pays for itself in practice value within a few years — and unlike most home upgrades, it’s one you’ll use almost daily. For a more detailed cost breakdown by material, check out putting green turf cost: what to expect.
Building and Maintaining Your Backyard Putting Green
The planning is done. Now it’s time to move dirt, lay turf, and turn a patch of yard into something you’ll use every day. These three sections cover the physical execution in order: preparing the site, installing the surface, and establishing the maintenance routine that keeps everything playing well for the next 15+ years.
Preparing the Site and Base
Every putting green that fails within two or three years fails for the same reason: the base wasn’t right. A poorly prepared subbase creates settling, pooling, and uneven ball roll — and it’s the one mistake you can’t fix without tearing the entire green up and starting over. This step takes the most time and the least glamour. It’s also the one that matters most.
Step-by-step base preparation:
- Clear and excavate. Remove all existing vegetation, roots, and topsoil from the green area. Excavate to a depth of 4–6 inches below your target finished grade. For areas with heavy clay soil, go deeper — 6–8 inches — to allow room for more drainage aggregate.
- Grade for drainage. This is non-negotiable. The excavated surface must slope away from any structures (house, retaining walls) — a standard consistent with USGA putting green construction guidelines. In practical terms, that’s roughly a 1-inch drop for every 4–8 feet of horizontal run. In regions with heavy rainfall or clay soils, install perforated drain pipe (4-inch diameter, wrapped in filter fabric) along the low side of the green, connected to a suitable outlet — a dry well, drainage ditch, or storm drain connection.
- Install geotextile weed barrier. Lay commercial-grade landscape fabric across the entire excavated area. This prevents weed growth from below and keeps the aggregate base from migrating into the underlying soil over time. Overlap seams by at least 6 inches.
- Build the aggregate base. Fill with 3–4 inches of compactable crushed stone, commonly referred to as “crusher run,” “3/4-minus,” or “road base” depending on your region. This is angular, fractured rock that locks together when compacted, creating a stable, load-bearing, free-draining foundation. Do not use rounded pea gravel. It shifts under foot traffic and never fully stabilizes.
- Compact mechanically. Use a plate compactor (available at any equipment rental yard) and make at least 3–4 passes over the entire surface. Hand tamping is insufficient for any green larger than about 100 square feet. The test is simple: walk across it in work boots. If the surface deflects under your heel, keep compacting. After you’re satisfied, check your grade with a long straightedge or laser level — this is the last chance to correct dips or high spots before they become permanent features.
- Apply the leveling layer. Top the compacted aggregate with approximately 1 inch of fine crushed rock (sometimes called “stone dust” or “decomposed granite”) or coarse sand. This layer allows for precise final grading and creates the smooth surface the turf will sit on. Compact lightly and screed to your designed contours.
Regional considerations matter. Sandy soils drain naturally and may need less aggressive drainage infrastructure. Clay soils hold water and require more aggregate depth and dedicated drain lines. In cold climates where the frost line extends below 12 inches, increase base depth to resist frost heave — consult local building guidelines for frost depth in your area. For more detailed installation steps, our full putting green installation guide walks through each phase with additional detail.
With a solid, properly drained base in place, the surface installation becomes the rewarding part.
Installing the Putting Surface
If your base is right, this is the most satisfying day of the entire project. You’ll go from bare aggregate to a playable putting green in a matter of hours.
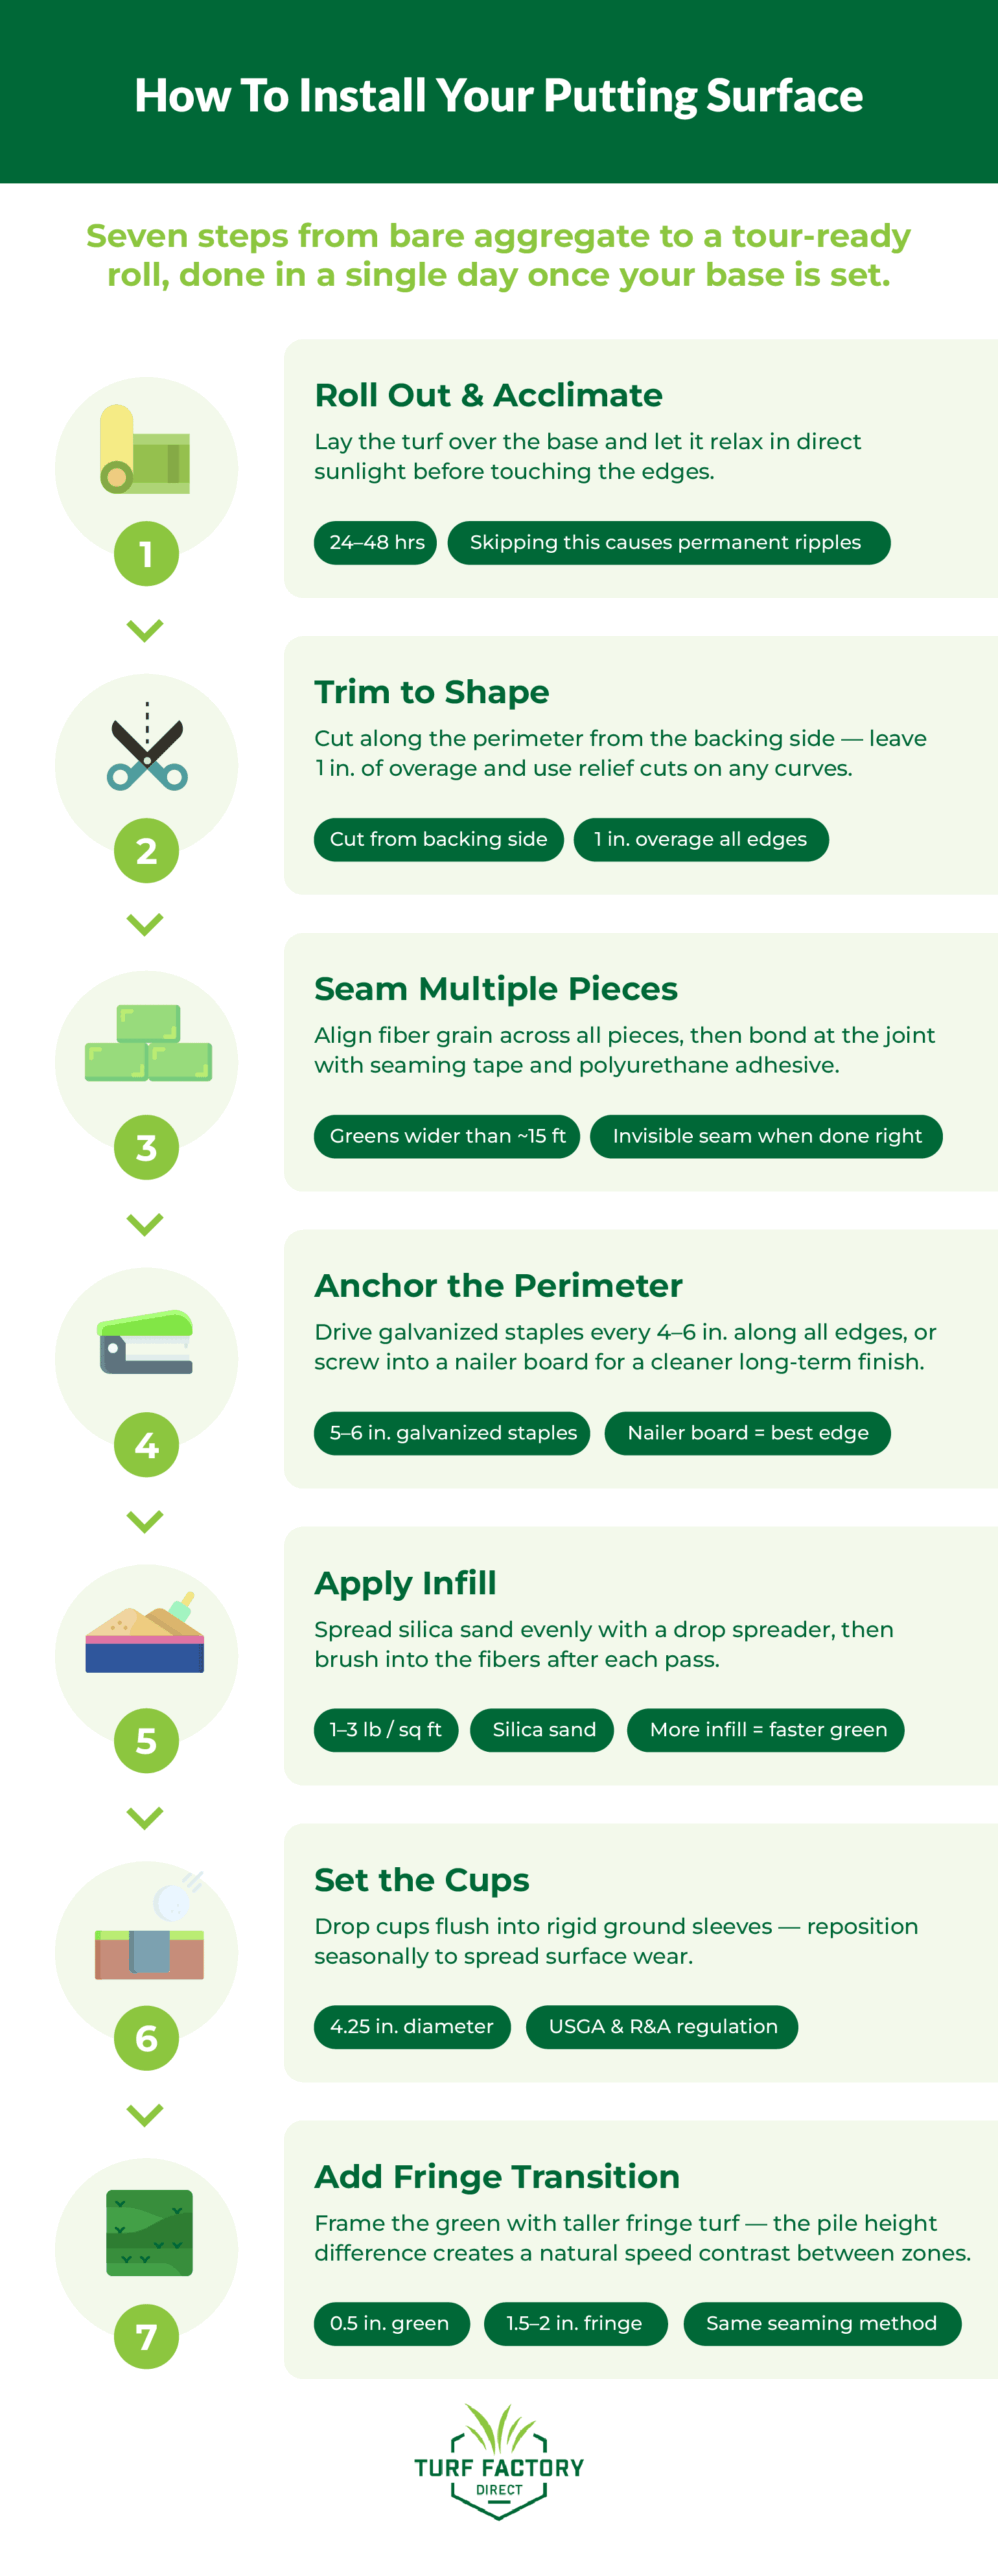
Installation sequence:
- Roll out and acclimate. Unroll the turf over the prepared base and let it relax in direct sunlight for 24–48 hours. Synthetic turf ships tightly rolled and needs time to flatten and relieve internal stresses. Attempting to secure wrinkled turf leads to permanent ripples that affect ball roll.
- Trim to shape. Using a sharp utility knife, trim the turf to match your green’s perimeter, leaving approximately 1 inch of excess on all sides. Cut from the backing side for cleaner edges. For curved or organic shapes, make relief cuts at tight bends so the turf lays flat without bunching.
- Seam multiple pieces. If your green requires more than one piece of turf (most greens over 15 feet wide will), align the pieces so the grain direction matches — fibers should all lean the same way, or ball roll will be inconsistent across the seam. Use outdoor seaming tape and polyurethane adhesive along the joint. A properly executed seam is invisible from standing height.
- Secure the perimeter. Anchor the turf edges with 5–6 inch galvanized landscape staples every 4–6 inches along the perimeter, or install a nailer board (treated 2×4 or composite) around the edge and secure the turf with screws and washers. A nailer board perimeter gives the cleanest edge and simplest long-term maintenance.
- Apply infill. Infill is what gives the green its speed, stability, and realistic feel underfoot. Silica sand is the standard for putting greens — heavy enough to stabilize the turf fibers, keep them upright, and provide the firm surface needed for true ball roll. Typical application rate is 1–3 pounds per square foot, depending on the turf’s pile height and your target speed. Apply with a drop spreader in thin, even passes, and brush into the fibers with a stiff-bristle push broom or power broom after each pass. Infill depth directly controls green speed. More infill means less exposed fiber, which means faster roll. Less infill means more fiber grab, which slows the ball down. This is how you tune your green to your preferred Stimpmeter reading after installation, and it’s an adjustment you can revisit anytime, not a one-shot decision.
- Install cups. The regulation hole diameter is 4.25 inches, standardized by the USGA and R&A. Set plastic or aluminum practice cups flush with the turf surface in pre-cut holes. Use rigid ground sleeves so cups can be repositioned seasonally to vary your practice and distribute wear.
- Add fringe transition. If your design includes a chipping fringe, install the taller fringe turf (typically 1.5–2 inch pile) around the putting surface edge. Seam the fringe to the putting turf using the same tape-and-adhesive method, and use a different infill depth to create the speed contrast between fringe and green.
After installation, give the green a thorough watering to help the infill settle, then test your ball roll. Now the question becomes: how do you keep it playing this well for the next two decades?
Maintenance: Keeping Your Green in Top Shape
Thirty minutes a month. That’s the maintenance commitment for a synthetic putting green — roughly the time it takes to mow a natural grass lawn once. The routine is simple: brush, rinse, inspect. Everything else is seasonal or annual.
Monthly:
- Brush the putting surface with a stiff-bristle broom to keep fibers upright and prevent matting in high-traffic areas.
- Rinse with a garden hose to remove dust, pollen, and organic debris.
- Inspect for any seam separation or edge lifting.
Quarterly:
- Check infill depth — you can feel low spots where ball roll changes. Top up with silica sand as needed and brush in.
- Clear leaves or debris that have accumulated in corners or along borders.
- Inspect drainage — after a heavy rain, confirm water is moving off the surface, not pooling.
Annually:
- Deep-clean the surface with a mild detergent solution and thorough rinse.
- Check all perimeter anchoring for looseness.
- Inspect cup sleeves and replace any that have cracked or shifted.
- Apply antimicrobial treatment if you’re in a humid climate where algae or mold could develop on the infill surface.
Seasonal notes: In cold climates, clear snow with a plastic shovel or leaf blower — never a metal blade, which can slice the turf fibers. In hot climates, a quick hose-down on scorching days brings the surface temperature down for comfortable play. In rainy regions, your quarterly drainage check becomes especially important after heavy storms.
Quality synthetic turf lasts 15–20 years with this level of care. A natural grass green, by comparison, requires annual overseeding and can be killed outright by a single bad season of drought, frost, or disease, followed by a 6–12 month re-establishment before it’s playable again.
Starting with premium synthetic turf is the single best thing you can do for long-term performance and low maintenance. Turf Factory Direct’s putting green turf products are built for exactly this kind of longevity.
With maintenance handled, let’s talk about the real reason you built this green — using it.
Getting the Most from Your Backyard Putting Green
A backyard putting green is only as valuable as the time you spend on it. Turning your investment into measurable skill improvement, a genuine entertainment asset, and something you reach for as naturally as your morning coffee.
Customizing Your Green for Style and Function
Custom flags in the cup. Recessed LEDs glowing along the perimeter at dusk. A stone border that flows into the patio as if the architect planned it that way. These are the details that turn a functional putting green into a backyard showpiece — one that gets used every day and talked about every weekend.
Personalization sounds minor, but it matters more than most homeowners expect. A green with your initials on the flags and branded cups doesn’t feel like an installation — it feels like yours. That sense of ownership drives the daily use that justifies the investment in the first place.
Landscape lighting is arguably the single best add-on. Recessed LED fixtures around the perimeter extend your practice window by 2–3 hours on summer evenings and make the green a dramatic focal point after dark. Solar-powered path lights along approach walkways are a low-cost alternative that still creates the effect.
What separates a green that looks like it belongs from one that looks dropped onto the lawn is visual integration with its surroundings. Border plantings — low ornamental grasses, boxwood, or seasonal flowers — create a natural transition. Stone or brick edging adds structure. If the green is near a patio or pool deck, carry the same hardscape materials into the green’s border for continuity.
Family-friendly features expand who uses the green and how often. A larger cup option (6 or 8 inches) in one hole makes the green accessible for younger kids. A scorecard posted near the first hole turns casual putting into friendly competition. Some homeowners add adjacent cornhole boards, a beverage station, or a small fire pit — creating a complete outdoor entertainment zone that happens to have a putting green at its center.
Rotate hole positions quarterly, host a monthly neighborhood putting tournament, add seasonal touches around the holidays. A green that evolves stays interesting.
Beyond customization, the real value comes from structured practice.
Practice Drills and Routines That Improve Your Game
A backyard putting green only improves your game if you use it with intention. The pattern is consistent: structured 15–20 minute sessions 3–4 times per week produce measurably better results than occasional casual rolling. That’s three to four hours per month of focused practice — less time than most golfers spend driving to the course and warming up.
A simple daily routine (15–20 minutes):
- 5 minutes: Confidence putts (3–4 feet). Make 10 in a row from 3 feet before moving back to 4 feet. This builds the stroke confidence that eliminates three-putts.
- 5 minutes: Lag putts (10–15 feet). Focus on distance control — your goal isn’t to make these, it’s to leave every putt within a 2-foot circle of the hole. Lag putting is where most amateurs hemorrhage strokes without realizing it.
- 5 minutes: Breaking putts. Pick a hole on a sloped section of the green and putt from multiple angles. Read the break, commit to a line, evaluate the result. This develops green-reading skills that directly transfer to the course.
Three drills worth adding to your rotation:
- The Gate Drill: Place two tees just wider than your putter head, 2 feet in front of your ball on a straight putt line. The gate forces a square face at impact — one of the most fundamental putting mechanics. If the ball clips a tee, your face was open or closed. Simple feedback, no ambiguity.
- The Ladder Drill: Set up putts at 3, 6, 9, and 12 feet from the same hole. Work up the ladder — you must make the 3-footer before attempting the 6-footer, and so on. This builds both confidence at close range and pressure tolerance at distance.
- The Clock Drill: Place four balls at 5 feet from the hole at the 12, 3, 6, and 9 o’clock positions. Make all four. Move to 8 feet. Then 10 feet. This single exercise covers straight putts and breaking putts simultaneously and quickly reveals directional weaknesses in your stroke.
Tracking progress transforms practice from casual to purposeful. Keep a simple putting journal or use a phone app to log your make/miss percentages at different distances. Over weeks, the patterns become unmistakable, and watching your 6-foot make percentage climb from 50% to 75% is the kind of evidence that keeps you coming back to the green before dinner. Connect these results to the practice goals you defined earlier — this is where that planning pays off.
Your Green, Your Rules
A golf putting green for your backyard is one of those rare home projects where the return isn’t hypothetical — you feel it in your short game, see it in your property’s curb appeal, and live it every evening you step outside instead of scrolling through your phone. The whole project comes down to three decisions that matter more than everything else: invest in a properly compacted aggregate base that won’t settle or puddle, choose quality synthetic turf that delivers consistent speed and holds up for 15–20 years, and design the green around the specific practice goals that will actually improve your game.
Well-designed landscaping can increase a home’s perceived value by 5%–12%, and few outdoor features deliver the combination of daily utility, social appeal, and long-term durability that a well-built putting green offers. Add structured practice into the mix, and you’re not just maintaining your game — you’re actively sharpening it, one 15-minute session at a time.
Ready to build your backyard golf haven? Explore our putting green turf product selection to find the right surface for your project, or start with putting green turf samples to see and feel the quality firsthand.