Transform your backyard into a personal short-game practice haven with a custom chipping green that delivers consistent year-round performance. Whether you’re targeting precise distance control, mastering tricky lies, or simply enjoying convenient practice without the drive to the course, a thoughtfully designed chipping green blends professional-grade performance with your unique style and outdoor living goals. Success comes from smart choices in layout, materials, lighting, and landscape integration—creating a low-maintenance retreat that feels like a natural extension of your home while sharpening the shots that make the biggest difference in your scores.
Key Takeaways
- Custom chipping greens call for careful choices on layout, materials, and how the space meshes with your existing yard.
- The right turf and build methods deliver durability and natural ball reaction over time.
- Details like lighting, cup locations, and fringe treatments turn a basic practice spot into an inviting outdoor feature.
Designing Your Personalized Chipping Paradise
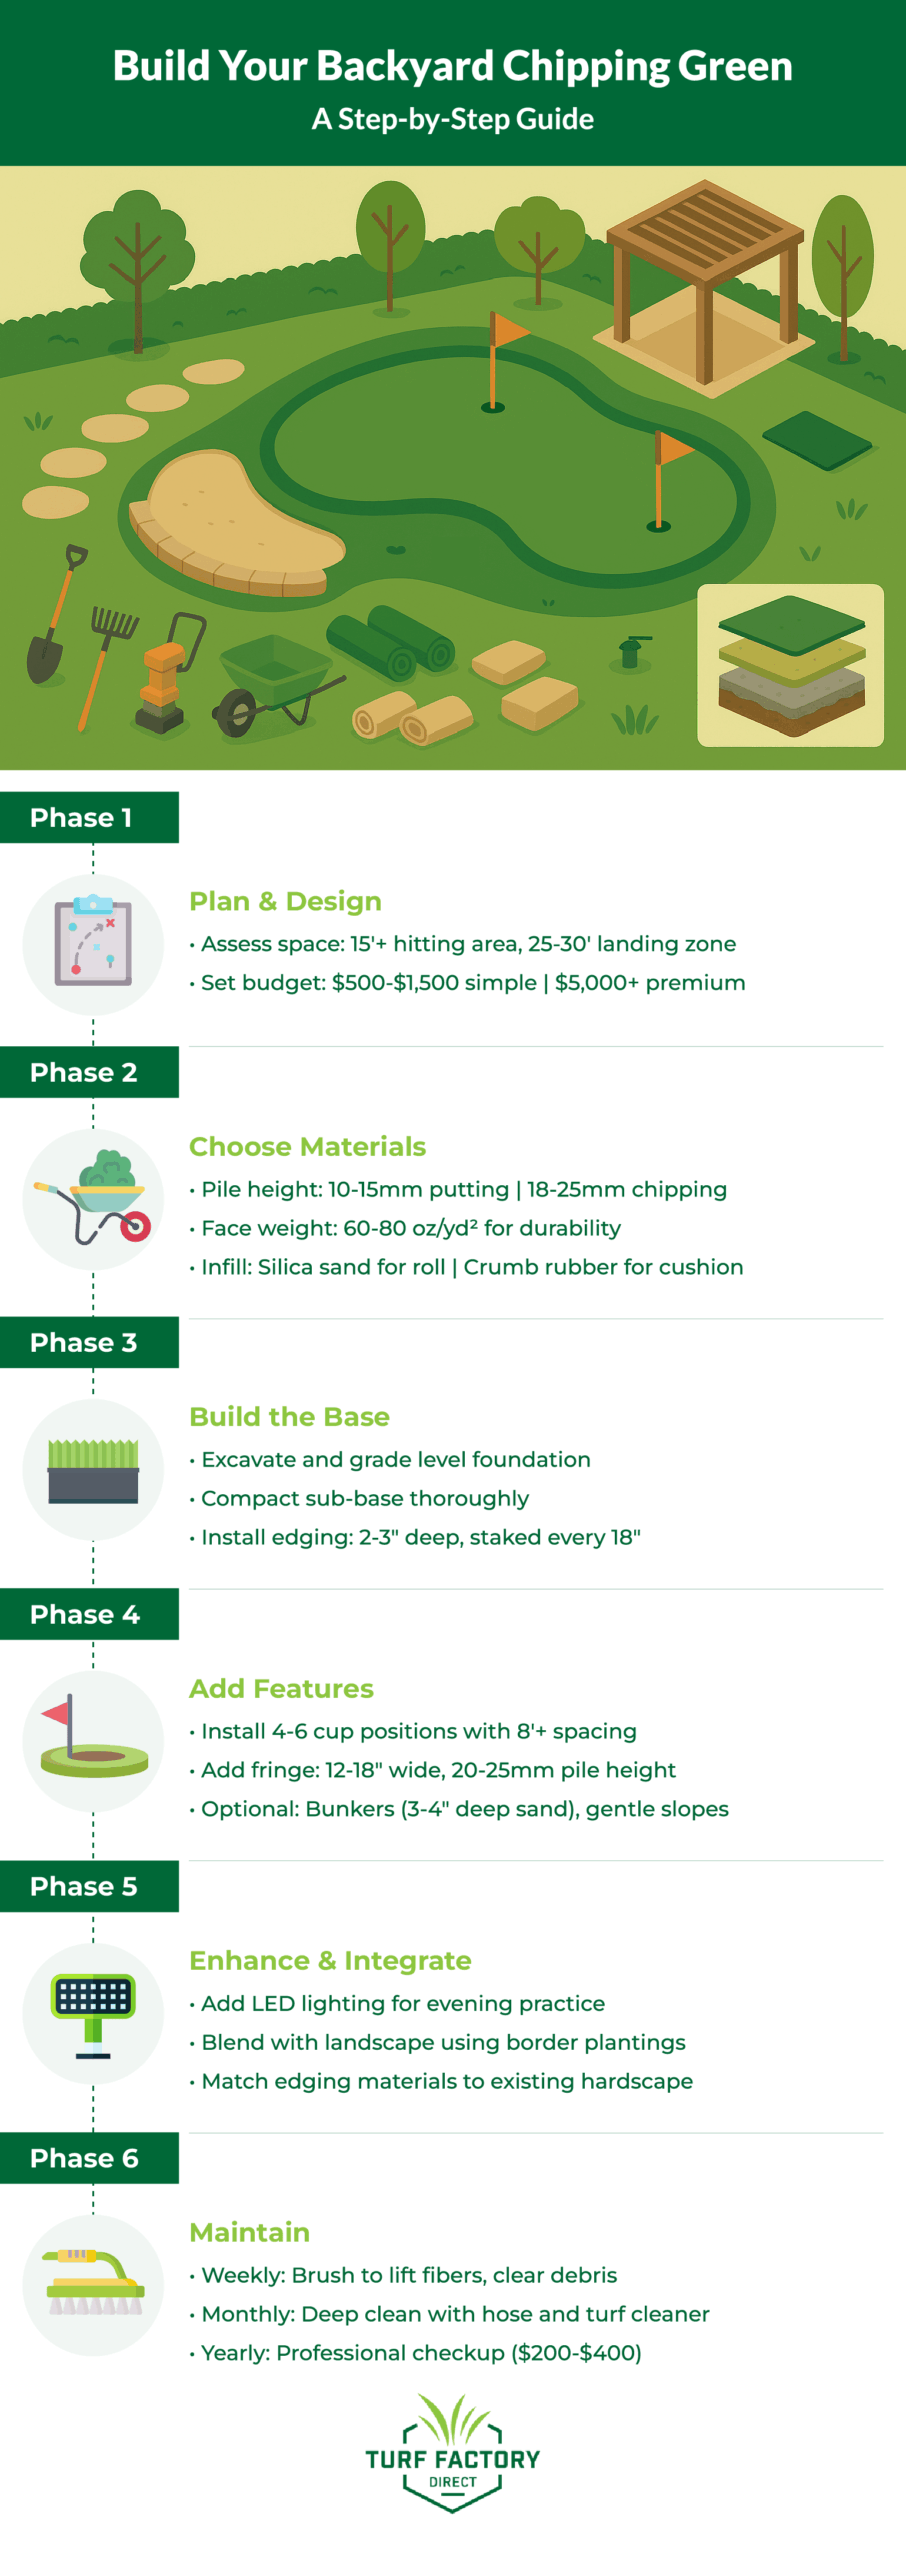
Building a useful chipping area starts with your practice goals and the space you can dedicate. The design unfolds in three phases: clarify what you want to improve, map the footprint and flow, and add features that sharpen specific skills.
Shaping Your Vision
Begin by listing current short-game gaps and the shots you want to improve. Picture yourself stepping out your back door on a quiet evening, wedge in hand, dropping balls onto your personal practice green—no driving to the course, no range fees, just focused reps on the shots that save strokes. Decide if you need work on distance control, launch height, spin management, or lie-dependent technique.
Write down how often you practice and how long sessions usually run. That cadence sets expectations for durability, variety, and convenience.
Space Assessment Factors:
- Available square footage
- Existing landscape features
- Drainage patterns
- Sun exposure throughout the day
- Proximity to neighbors
Set a budget early so tradeoffs are clear. A basic DIY build typically runs $500–$1,500 and includes quality putting turf, essential base preparation, simple edging, and basic infill—perfect for committed golfers willing to handle excavation and installation themselves. Mid-range projects ($1,500–$3,500) add professional installation labor, premium turf with realistic roll characteristics, multiple pin positions, and basic landscape integration. Premium installs exceeding $5,000 incorporate advanced features like integrated lighting systems, custom contours mimicking your favorite course, practice bunkers with quality sand, and comprehensive hardscape tie-ins that make the green feel like a natural extension of your outdoor living area.
According to industry cost data, professional artificial turf installation averages $6–$22 per square foot installed, depending on turf quality, site preparation complexity, and feature additions.
Account for your climate and seasonal patterns. Colder regions benefit from covered stations or portable components that protect surfaces and extend practice time.
Mapping Out Your Layout
Aim for at least 15 feet of hitting area with 25–30 feet of landing space to cover common chip distances. This footprint lets you practice the shots that matter most: imagine recreating that tricky 20-yard pitch over a bunker that you face regularly at your home course, or working on bump-and-run shots with various clubs to dial in distance control. Rectangular or L-shaped footprints fit most yards and keep shot options open.
Place the hitting zone on level ground when you can. Gentle slopes add realism and variety but may require extra sub-base work and careful grading.
Essential Layout Elements:
- Tee area: 6–8 feet wide, supporting multiple lie types
- Landing zones: Targets at roughly 10, 20, and 30 yards
- Rough sections: Fringe or longer turf around the perimeter
- Storage: Spots for ball pickup, baskets, and training aids
Outline the design with spray paint before any digging. Walk your intended shot paths to confirm clearance and safe angles.
Check sight lines from windows, patios, and seating areas. The green should add to the view and overall curb appeal, not distract from it.
Adding Features to Sharpen Skills
Use multiple pin positions with movable cups or flags at staggered distances. Rotating targets keeps practice challenging and fresh.
Add a small bunker or practice sand area near landing zones. A well-designed practice bunker does more than look authentic—it simulates the precise challenge you face when your approach lands greenside at your favorite course. That awkward buried lie in the front bunker, the downhill explosion shot, the delicate splash to a tight pin: you can recreate these exact scenarios and groove the technique that builds on-course confidence. Playground sand or specialty bunker sand delivers consistent splash and lie quality.
Skill-Building Additions:
- Subtle elevation changes (raised sections, gentle slopes)
- Varied lies (tight, fluffy, and compacted/hardpan)
- Soft obstacles (micro-mounds, taller rough swales)
- Distance markers at 5-yard steps for feedback
Install lighting so evening sessions feel natural. Imagine lining up a chip under soft, even light that makes your green glow like a resort feature—perfect for unwinding after work or squeezing in practice while dinner cooks. Focused LED spots provide coverage without washing out neighboring yards. Professional golf lighting should deliver 50–100 foot-candles for practice greens while minimizing light pollution, following IES standards for sports lighting.
Create collection zones with netting or low berms behind the green. Faster retrieval means more swings and better rhythm.
Add a compact putting lane near the chipping area. Moving seamlessly from chip to putt simulates on-course sequences and reinforces touch. Learn more about creating comprehensive golf practice areas at home.
Choosing Materials and Building It Right
Great performance starts with the right turf system and clean transitions. The sub-base, edge treatments, and hazard placement all contribute to a green that looks great and plays consistently.
Picking the Right Turf
Synthetic golf turf quality ranges widely. Premium artificial putting greens from trusted manufacturers deliver consistent roll, colorfast fibers, and strong wear resistance in home settings. When evaluating turf options, focus on independently verified specifications rather than brand claims alone—look for products that meet or exceed ASTM F1551 standards for synthetic turf performance.
Pile height drives ball speed and feel on putts. A 10–15 mm pile height provides true roll similar to well-kept greens. Research published in Procedia Engineering analyzing golf ball behavior on artificial turf confirms that shorter pile heights (8–13 mm) most closely replicate professional bentgrass greens, with stimpmeter readings of 10–12 feet typical for quality installations.
Face weight reflects density and longevity. For most homes, 60–80 oz/yd² balances durability, appearance, and cost. Denser products resist matting and keep roll speeds stable.
Backing influences drainage and shape retention. Polyurethane backings cost more but shed water efficiently and hold dimensions better than many latex options.
Fiber composition affects performance:
- Nylon fibers are highly durable and firm underfoot
- Polyethylene blends feel softer with solid resilience
- Polypropylene suits budget builds but shows wear sooner
Infill supports fibers and tunes speed. Silica sand gives consistent roll; crumb rubber adds cushion in chipping zones and around impact points. The Sports Turf Managers Association recommends checking infill levels annually and topping up every 1–2 years to maintain optimal playing characteristics.
Turf Factory Direct offers a range of artificial turf products specifically engineered for golf applications. Explore premium putting green turf options designed to deliver professional-grade performance for home installations.
Designing the Fringe and Edges
Keep fringe widths around 12–18 inches to set off the putting surface and create realistic chipping lies with different textures.
Use longer pile (20–25 mm) on fringe areas. That step-up in height mimics course transitions and broadens your practice options.
Edge treatment options include:
- Aluminum edging for crisp, durable borders
- Flexible plastic edging for smooth curves
- Natural stone for a landscape-first look
- Treated lumber where a raised build makes sense
Secure edges keep lines sharp. Set edging 2–3 inches deep and stake curves roughly every 18 inches for stability.
Blend fringe into your lawn with careful grading. Keep transition slopes gentler than a 3:1 ratio so mowing remains easy and lies stay fair.
Adding Challenges and Hazards
Bunkers need drainage and consistent depth. Angular sand in the 0.5–1.0 mm range stays in place and plays predictably. Maintain 3–4 inches across the surface. For context, USGA construction specifications for championship-quality bunkers call for similar sand gradations and depths, ensuring realistic practice conditions.
Use base shaping to add gentle breaks. Compact sub-base to build subtle contours; target grades up to about 3% to preserve realistic green speeds and smooth roll-out.
Strategic hazard placement:
- Keep bunkers roughly 6–8 feet from common pin spots.
- Provide approach angles from more than one teeing point.
- Use catch nets 8–10 feet behind the green for safety and convenience.
Water features bring visual appeal and sound but require power, plumbing, and maintenance planning. Recirculating pumps reduce upkeep while keeping the aesthetic.
Multiple cup locations extend practice variety. Aim for 4–6 total positions with at least 8 feet of spacing to protect edges and maintain roll quality.
Aesthetic Enhancement and Landscape Integration
A chipping green that looks native to your yard comes from thoughtful materials, balanced lighting, and multi-use features. The goal is a space that improves your practice and elevates everyday outdoor time.
Seamlessly Blending With Your Yard
Let existing grades guide the design so the green follows your landscape rather than fighting it. When your property slopes, carry that contour through the surface and surround.
Choose fringe materials that mirror your current plantings and hardscape. Traditional lawns pair well with natural grass fringes; modern yards benefit from gravel bands or mulched beds for clean transitions.
Border treatments drive the first impression. Stone that matches existing patios creates continuity and tells visitors this feature was always meant to be here, while painted metal edging can echo trim colors for a custom touch that ties the green to your home’s architectural style.
Plan around sight lines from kitchens, living rooms, decks, and fire pits. Place bunkers and raised areas where they add interest without blocking key views or crowding walkways.
Perimeter plantings soften edges and knit the space into the garden. Low grasses, compact hedges, and seasonal color add texture without intruding on shot paths. Check out our guide for planning and building your personal putting green for other practical advice.
Lighting for Practice and Ambiance
Low-glare LED strips tucked under raised green lips spread even light across the surface for night practice and a subtle glow for gatherings. Picture hosting friends for an evening cookout: as dusk falls, your green becomes a softly illuminated conversation piece, inviting friendly putting competitions while maintaining the warm ambiance of your outdoor living space.
Solar path lights along boundaries guide foot traffic and mark lines during practice while adding gentle evening ambiance.
For higher-intensity sessions, use adjustable floods on telescoping poles. Aim from two directions to reduce shadows, and select dimmable fixtures to tune brightness for practice or entertaining.
Color-tunable LEDs switch from neutral white for training to warm hues for downtime, with festive options for parties when you want a different vibe. Professional installations typically use 4000K–5000K color temperatures to mimic natural daylight during practice, enhancing ball visibility and reducing eye strain.
Consider smart scenes you can toggle: a bright “practice” preset and a softer “evening” preset for dinners and conversations outdoors.
Functional Features That Do Double Duty
Raised tee platforms that double as tiered planters frame the space. Fill unused tiers with herbs or annuals to keep the area lively between sessions—your chipping green becomes a functional garden feature that looks intentional and beautiful even when you’re not practicing.
Bunkers can convert to fire features with gas ring inserts and protective grates. Work on explosion shots by day; gather with friends at night.
Hidden storage in benches and seat walls keeps balls, shag bags, and alignment sticks out of sight. Clean lines outside, easy access inside.
Streams and ponds add a playable hazard and a calming soundtrack. Place them to challenge distance control without risking errant balls into walkways.
Retaining walls around raised greens offer seating, define zones, and provide sturdy edges. Cap with stone or composite materials that match your furniture and steps.
Practical Considerations and Implementation
A little foresight saves budget and hassle. Prioritize accurate measurements, phased upgrades, and a simple maintenance plan that keeps roll true across seasons.
Cost-Saving Design Tips
Measure carefully to right-size orders and limit waste. Confirm dimensions twice and add roughly 10% to turf calculations to cover trimming.
Leverage native soil for the base where conditions allow. Skim 2–3 inches, amend with sand for drainage, and compact thoroughly—this approach saves you hauling costs and keeps the project more manageable for weekend warriors tackling installation themselves.
Spread the build over phases to match budget and bandwidth:
- Phase 1: Core green and sub-base
- Phase 2: Fringe, edging, and plantings
- Phase 3: Lighting, bunkers, and specialty features
Pick mid-grade turf for a strong value. In many backyards, quality mid-range turf delivers roll characteristics and durability within 10–15% of top-tier products while shaving 30–40% off material costs—an investment that makes sense for dedicated golfers focused on practice over tour-level specifications.
DIY prep tasks like excavation, base leveling, and edging. Bring in pros for seam work and electrical to protect performance and safety.
Keeping Your Green in Top Shape
Brush weekly to lift fibers and reduce matting. Use a stiff push broom and vary directions to keep roll consistent. The Sports Turf Managers Association recommends brushing high-traffic areas 2–3 times per week, while residential practice greens benefit from weekly maintenance. Learn more about proper artificial turf maintenance techniques.
- Clear leaves and twigs daily with a blower or plastic rake. Organic buildup traps moisture, creates odors, and flattens fibers.
- Deep clean monthly with a hose rinse and turf-safe cleaner to remove dust, pollen, and residue that can slow roll and harbor microbes.
- Check drainage after storms and clear blockages quickly. Standing water softens the base and degrades seams over time.
- Top up infill in high-traffic zones every 6–8 months. Fresh silica restores firmness, tunes speed, and supports fiber rebound.
- Schedule a yearly professional checkup to catch seam lift, edge creep, or base settling early. Plan $200–400 for this preventive visit.
Built to Grow With You
Your practice needs will evolve as your game improves, your family grows, and your outdoor living priorities shift over time. Smart infrastructure choices made during initial installation—extra conduit runs, modular edging systems, flexible planting zones—turn future upgrades from major renovations into simple afternoon projects. Think of your chipping green as a living feature that can adapt alongside your skills and lifestyle: today’s basic practice surface becomes tomorrow’s multi-feature training complex without tearing everything out and starting over. These forward-thinking design strategies protect your investment while keeping expansion options open.
- Run extra conduit during initial install so future lighting or power needs don’t require tearing up edges later.
- Use modular fringe pieces with removable edging for easy expansion. Aluminum strips make future changes cleaner than concrete curbs.
- Create flexible planting zones that can be moved as your practice needs or aesthetics change with time.
- Document your spec sheet—turf model, infill type, base materials, and edging brand—so additions match seamlessly down the road.
- Choose adjustable features like removable obstacles and multiple cup sleeves to refresh practice without rebuilding.
- Keep service paths open for carts, rollers, and maintenance equipment so care remains simple as the space matures.
Take Your Short Game to the Next Level with Turf Factory Direct
Ready to build a backyard chipping green that delivers professional performance and year-round reliability? Turf Factory Direct offers premium solutions engineered specifically for serious golfers:
TFD Birdie Putt Elite: Our flagship putting green turf features ultra-short pile height (10–13 mm) for authentic roll characteristics that mimic championship bentgrass greens. With superior face weight (60+ oz/yd²) and advanced polyurethane backing, Birdie Putt Elite delivers the consistent ball reaction you need to dial in distance control and read breaks with confidence. Perfect for dedicated practice greens where true roll and stimpmeter speeds matter most.
TFD Elite Fringe: Finish your green’s edge with this durable 1-inch pile (25 mm) border turf, boasting 69 oz/yd² face weight and tri-color nylon/polyethylene yarn for realistic course-like transitions. Designed for fringe/border use, its dense construction excels for chipping practice with varied lies. The perforated backing ensures optimal drainage while the taller pile creates authentic bump-and-runs and soft pitches, resisting matting for long-lasting performance.
TFD Approach Pad: Take your chipping practice to the next level with this versatile hitting surface designed for realistic ball interaction on wedge shots, chips, and pitch shots. The Approach Pad’s specialized fiber blend and cushioned backing absorb impact naturally while providing authentic turf feedback—ideal for grooving your short-game technique without the wear patterns that plague standard turf. This works great for chipping, giving you the confidence to practice high-rep sessions that translate directly to lower scores on the course.
These products ship nationwide with complete installation resources and responsive customer support. Order samples to compare roll speeds, textures, and colors in your own light before committing to your full build.
Turf Factory Direct supplies artificial turf built for golf performance, with products that deliver consistent roll, true bounce, and a natural look for home practice. Pro-grade materials help your green keep its shape and color. Our lineup spans multiple pile heights and fiber blends so you can tailor speed, firmness, and feel to your goals.
Our installation support includes step-by-step resources and responsive assistance. You’ll find specs, care guides, and practical design tips to make planning and upkeep straightforward.
| Turf Type | Pile Height | Best For |
| Putting Green | 12–15 mm | Short putts, true-roll practice |
| Chipping Turf | 18–25 mm | Approach shots, fringe work |
| Fairway Blend | 30–35 mm | Longer chips, natural transitions |
Nationwide shipping and bulk pricing make larger projects feasible. Order samples to compare speeds, textures, and colors in your own light before you commit. Customization choices include green speeds and color tones that blend with existing landscapes while preserving authentic ball response during chips and putts.
With basic tools and solid prep, many installs fit a weekend timeline. Synthetic systems cut watering, mowing, and fertilizing while keeping practice conditions reliable throughout the year.