The sun sets behind your house as you line up a 12-foot putt with a subtle right-to-left break. The surface beneath your feet feels identical to the greens at Augusta National—smooth, fast, true. This isn’t a country club. It’s your backyard, where you’ve eliminated the 45-minute drive to the course, the $75 green fees, and the frustration of waiting for a spot on the practice green. In three focused days of installation, you’ve created what many avid golfers dream about: a personal golf sanctuary that delivers tour-quality practice conditions whenever inspiration strikes.
You can transform your backyard into an authentic golf course putting green at home by combining professional-grade synthetic turf, strategic contouring with 2-3% slopes for realistic breaks, engineered drainage systems maintaining 1-2% surface grade, and signature course design elements.
Key Takeaways
- Installation Timeline & Cost: Professional installation takes 1-5 days¹ with costs ranging from $15-40 per square foot².
- Professional Performance: Achieve PGA Tour green speeds of 12-14 on the stimpmeter³ with proper turf selection.
- Superior Drainage: Modern synthetic surfaces drain at 30+ inches per hour, ensuring year-round playability.
- Property Value: Outdoor living improvements return 65-80% of investment⁴ at sale.
- Low Maintenance: Annual maintenance costs average $250-550¹ versus thousands for natural grass.
- Longevity: Quality installations deliver 10-15 years of consistent performance¹.
- Energy Efficiency: LED lighting uses 75% less energy⁵ for evening practice sessions.
Building Your Personal Golf Practice Facility
Understanding the Value of a Professional Home Putting Green
Every stroke shaved off your putting average can significantly impact your total score—the mathematics that drive serious golfers to spend hours on practice greens. According to strokes-gained statistics, the average number of putts from 7 feet 10 inches is 1.5⁶. Yet the average golfer manages limited quality putting practice monthly, constrained by course availability, weather windows, and time. The USGA statistics indicate the average male golfer has at least 40 putts per round or 2.2 putts per hole⁷.
A residential golf course putting green at home eliminates these barriers while delivering measurable improvements. Home practice provides more repetitions in less time, with perfect conditions, zero wait time, and complete control over difficulty progression.
Convenience That Changes Everything
Save 90 minutes per practice session when factoring in driving, parking, warm-up, and waiting for green space. For golfers practicing three times weekly, that’s 234 hours annually—nearly six work weeks of reclaimed time.
Year-Round Practice Conditions
Modern synthetic putting green surfaces drain at 30 inches per hour per square yard, making them playable within minutes after rain. UV-stabilized fibers maintain consistent speed whether it’s 95°F or 35°F, eliminating the seasonal speed variations that plague natural greens. Practice your 6-footers in February when local courses sit under snow.
Smart Property Investment
Professional landscape assessments show backyard putting greens contribute to overall outdoor living ROI. Well-designed outdoor living spaces can return 65-80% of your investment⁴, with home renovation projects averaging 70% ROI⁸. In golf-centric communities, that return can be even higher, particularly when integrated with sophisticated landscape design.
Natural Entertainment Hub
Weekend gatherings gain focus. Children develop hand-eye coordination. Business associates remember the meeting that ended with a putting contest. The green becomes a multi-generational gathering point requiring no explanation or instruction—just clubs and competition.
Designing a Tour-Quality Backyard Putting Green
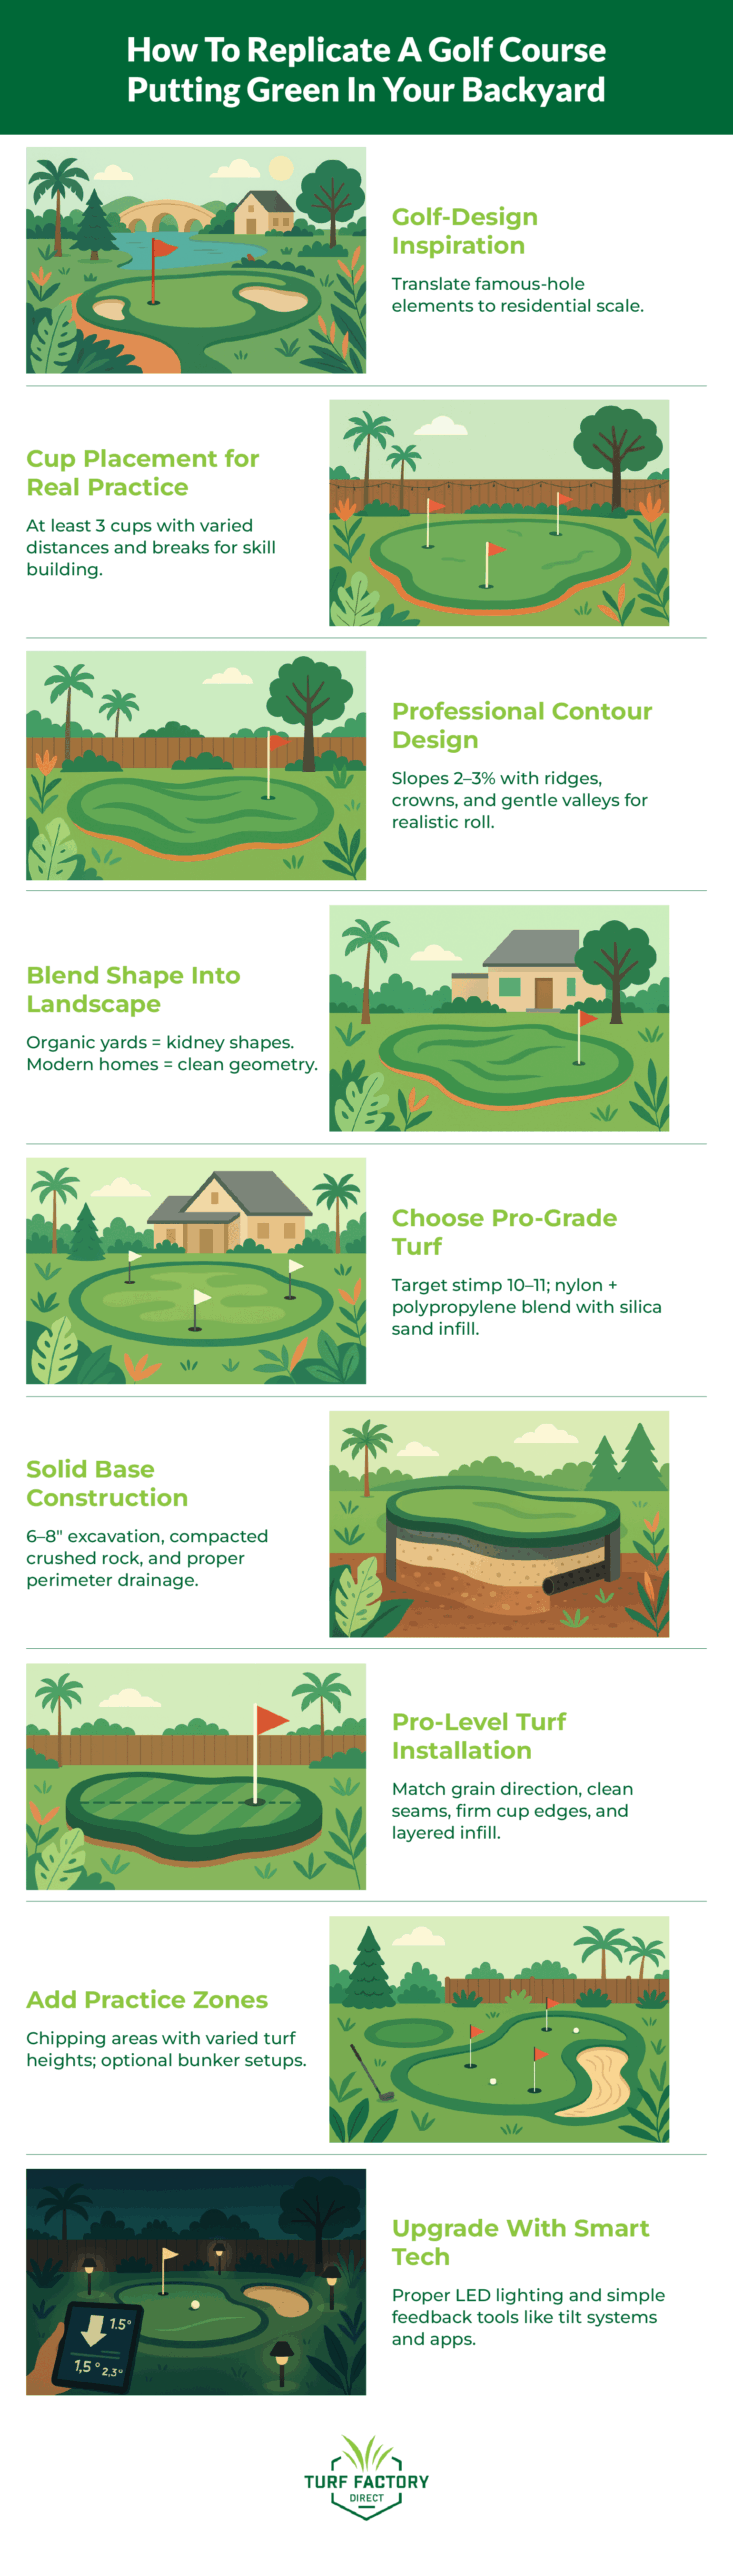
The 12th at Augusta National stretches just 155 yards, but its postage-stamp green has decided more Masters tournaments than any 600-yard par 5. Understanding what makes iconic holes memorable lets you translate those design principles to your 400-square-foot backyard canvas.
Start with signature elements from famous holes. The Valley of Sin at St. Andrews’ 18th—that devious hollow guarding the front—translates perfectly to residential scale at 18 inches deep and 6 feet wide. Oakmont’s lightning-fast surfaces with subtle, almost invisible breaks teach you to read grain and slope. Pebble Beach’s tiny 7th green demonstrates how size limitations force precision.
Strategic Cup Placement for Maximum Practice Value
Position three cups minimum: one for straight 8-foot confidence builders, another demanding a 20-foot lag with 6 inches of break, and a third creating 15-foot double-breakers that mirror tournament conditions. Multiple approach angles to each cup mean a 400-square-foot green with three thoughtfully placed holes provides 12 distinct practice putts.
Professional Contour Design Principles
Legitimate home putting green installations follow professional design standards. Your signature slopes should run 2-3% for standard play, with one section pushing 4-5% for tournament preparation. Each cup location needs adequate flatness around the hole to meet USGA guidelines for fair pin placement⁹.
Think of contours as sentences in a story. A ridge running diagonal across your green creates two distinct practice zones. A subtle crown in the center feeds balls toward collection areas. A gentle valley creates the optical illusion of uphill putts that run downhill—the same deception that catches players at Augusta’s 14th.
Explore raised putting green designs that maximize contour possibilities
Seamless Landscape Integration
Natural shapes with kidney or irregular borders blend with existing landscape. Geometric designs—perfect circles or rectangles—create modern, architectural statements. The choice depends on your home’s style and your landscape’s language. Prairie-style homes call for horizontal lines and native grass borders. Mediterranean estates demand curves and elevation changes echoing rolling hills.
Choosing Professional-Grade Putting Green Turf
The difference between a real putting green and a backyard carpet lies in three measurements: stimp rating, fiber composition, and infill dynamics. Understanding these technical elements ensures your investment delivers authentic play for the next 15 years.
Understanding Stimp Ratings and Speed
PGA Tour greens run at 12 on the stimpmeter most weeks, with major championships reaching 13-14³. Country clubs maintain 9-10 for member play. Your home golf green should target 10-11—fast enough for realistic practice, forgiving enough for casual entertainment. This speed comes from proper fiber height, density, and face weight specifications.
Material Science Behind Longevity
Nylon fibers provide superior resilience and memory, bouncing back after foot traffic to maintain consistent speed. Polypropylene offers UV resistance and color retention but may mat faster under heavy use. The ideal specification combines both: nylon for performance, polypropylene for durability. Quality manufacturers coat every blade with UV inhibitors during the manufacturing process, ensuring color retention regardless of sun exposure.
Browse professional-grade putting green turf options
Critical Infill Selection
Silica sand remains the gold standard for putting green infill. The sand settles between fibers, providing weight for stability and creating micro-variations that mirror natural surface inconsistencies. Application rates vary based on desired speed and performance characteristics.
Professional-grade silica sand infill
Premium top dressing for optimal play
Authentic Fringe Details
Transitional turf at 1.25″ height creates realistic rough conditions for chip-and-run practice. Color variation between putting surface and fringe—slightly darker green for the fringe—provides visual definition and depth perception crucial for reading breaks.
Pro Tip: Request samples to test ball roll before committing. Roll balls from identical positions on different samples, measuring both speed and deviation. Quality turf provides consistent roll with minimal bounce.
Order free turf samples to test at home
Professional Installation Process for Lasting Performance
Foundation Preparation That Ensures Success
The foundation determines 80% of your green’s long-term performance. Cutting corners during excavation or base preparation guarantees future settling, drainage issues, and inconsistent ball roll.
Precise Excavation Requirements
Remove 6-8 inches of existing soil for standard installations, 10-12 inches for areas with clay soil or drainage concerns. The excavation extends 12 inches beyond the planned green perimeter to accommodate edge restraints and drainage. Maintain a 1-2% grade away from structures—enough for drainage, subtle enough to remain invisible during play.
Engineered Base Layers
Start with 3-4 inches of crushed rock (3/4″ minus), compacted to 95% density using a plate compactor. Top with 2-3 inches of decomposed granite or crushed limestone (1/4″ minus), laser-leveled to within 1/8″ tolerance. This combination provides structural stability while allowing proper drainage rates.
Advanced Drainage Systems
French drains at 10-foot intervals handle subsurface water. Perimeter drains using 4″ perforated pipe wrapped in filter fabric connect to existing storm systems or dry wells. Professional installations ensure drainage grids underneath the surface for optimal performance. In clay soil, consider adding vertical drainage columns—8″ diameter holes filled with gravel every 6 feet—creating paths for water to escape the compacted subsurface.
Installing Your Professional-Grade Green Surface
Precision during turf installation separates amateur attempts from professional results that last 10-15 years¹.
Strategic Turf Positioning
All pieces must run the same grain direction or seams become visible. Position the putting surface with grain running toward the primary viewing angle (usually the house) for optimal aesthetics. Leave 3-4 inches of excess material at edges for final trimming after securing.
Invisible Seaming Technique
Overlap edges by 3/8″, then trim both pieces simultaneously for perfect mating. Apply adhesive to 6″ seaming tape, position carefully, then compress with a 75-pound roller. Temperature matters: install between 60-85°F for optimal adhesive curing.
Professional Cup Installation
Include drainage sumps extending 6″ below cup bottom, filled with pea gravel for water evacuation. Reinforce cup edges with additional adhesive and consider metal cup rings that prevent edge wear from repeated flag insertion.
Staged Infill Application
First application: 50% of total volume, brushed in perpendicular directions. Second application: 30% volume, focused on high-traffic areas. Final application: remaining 20% after two weeks of settling, ensuring optimal playing speed.
Expanding Your Practice Facility
Your putting green forms the centerpiece of a comprehensive practice facility rivaling exclusive country clubs.
Strategic Chipping Areas
A 10×10 foot synthetic rough area adjacent to your green enables short game practice from 5-50 yards. Use 2″ turf for fairway lies, 3″ for light rough, 4″ for heavy rough. Position multiple hitting stations around your green to practice different trajectories and spin rates.
Professional Panel for authentic tee box and fairway conditions
Approach Pad for realistic approach shot practice
Bunker Integration Options
Synthetic bunkers using specialized sand-colored turf eliminate maintenance while providing visual targets. Real sand bunkers beside synthetic greens create authenticity but require weekly raking, sand replacement every 2-3 years, and drainage systems to prevent washout.
Smart Technology Integration
Modern practice demands measurement. Today’s training technology transforms backyard practice into data-driven improvement.
Professional Lighting Systems
LED fixtures use at least 75% less energy and last up to 25 times longer than incandescent lighting⁵. Position lights at 10-foot height minimum, angled to eliminate shadows on the putting surface. Smart controls allow smartphone adjustment and scheduling—practice your sunrise putts under lights that gradually brighten, simulating dawn conditions.
Performance Tracking Technology
Ball return systems using subtle surface tilting (1% grade) and collection gutters maintain practice rhythm. Stimpmeter apps use smartphone cameras to measure actual green speeds. Launch monitors positioned beside your green capture swing data for approach shots, building the feedback loop between full swing and scoring shots.
Maintaining Your Investment for Decades of Performance
Weekly and Monthly Care Routines
The beauty of synthetic putting greens lies in their minimal maintenance requirements compared to natural grass. Where bent grass demands daily attention, your synthetic surface thrives on minutes of weekly care.
5-Minute Weekly Maintenance
Use a leaf blower at half-throttle to remove debris without displacing infill. Follow with light brushing using a push broom with synthetic bristles, always brushing against the grain to stand fibers upright. Walk the perimeter checking for edge lifting or separation—catching issues early prevents major repairs.
30-Minute Monthly Deep Care
Deep brushing redistributes infill material that migrates toward low areas. Use a specialized grooming brush or power broom, making perpendicular passes to ensure even distribution. Inspect seams closely—summer heat and winter cold create expansion and contraction that stress adhesive bonds. Add infill as needed to maintain proper levels.
Annual Professional Service
Artificial turf maintenance costs average $250-550 per year for cleaning, minor repairs, and infill replenishment¹. This includes professional deep cleaning to remove embedded debris and revitalize fibers. Apply fresh top dressing if ball roll has slowed—usually every 3-4 years depending on use intensity.
Protecting Your 15-Year Investment
Quality residential putting greens deliver 10-15 years of consistent performance¹ when properly maintained. Understanding degradation factors helps protect your investment.
Key Durability Indicators
Look for 8-year UV warranties, independent testing data, and quality fiber construction. Fiber memory—the ability to spring back after compression—separates premium products from budget alternatives. Regional climate matters: freeze-thaw cycles stress seams, intense UV degrades fibers, and high humidity promotes organic growth without proper drainage.
Common Issues and Professional Solutions
- Wear patterns: Rotate cup positions monthly to distribute traffic
- Seam separation: Early repair requires only seaming tape and adhesive ($50 in materials)
- Infill displacement: Redistribute and top off to restore consistent ball roll
- Organic growth: Quarterly antimicrobial treatment prevents moss or algae in humid climates
Complete guide to maintaining golf greens at home
Creating Your Complete Golf Paradise
Landscape Design That Enhances Practice
Your putting green anchors a larger vision—transforming outdoor space into a golf-inspired retreat that enhances both practice and lifestyle.
Course-Inspired Landscaping
Plant ornamental grasses (fountain grass or blue fescue) to suggest links-style rough. Position boulders strategically to create visual interest and practice obstacles. A small water feature adds the soothing sounds associated with premium courses while masking neighborhood noise during practice.
Entertainment Integration
Position seating areas with clear sight lines to the green, creating gallery spaces for competitive rounds. Install a beverage station within 20 feet of the green. Mount a scoreboard or digital display for tracking competitions and personal records. These additions transform practice into events.
Professional Storage Solutions
Efficient organization maintains the country club aesthetic while keeping equipment accessible.
Smart Equipment Organization
- Weather-resistant storage benches double as seating while protecting putters and training aids.
- Wall-mounted racks display clubs attractively while preventing garage clutter.
- Ball dispensers—pyramid-style holders or tube dispensers—keep practice balls organized and add professional touches.
Your Championship Moment Awaits
Standing over your final putt as evening light fades, you realize something profound has shifted. The 300-mile round trip to Pebble Beach for a $595 round no longer defines your golf aspirations. Your handicap has dropped three strokes in six months—not from weekend rounds, but from 15-minute evening sessions when inspiration strikes. Your children have developed golf swings on this same surface. Business relationships have deepened over friendly competitions. Your property has gained both monetary value and immeasurable lifestyle enhancement.
The transformation from backyard to personal golf course putting green at home requires just 1-5 days of installation¹, $15-40 per square foot² of investment, and a vision for how golf fits your life. You eliminate travel time, weather delays, and crowded facilities. You gain unlimited practice, entertainment space, and the daily satisfaction of maintaining tour-quality conditions steps from your door.
The question isn’t whether to create your home putting green, it’s how ambitious your vision should be. Start conservatively with 300 square feet of basic contours, or embrace the full experience with 600 square feet of multi-tiered, professionally lit, technology-enhanced practice paradise.
Your Next Steps
Start designing your dream putting green today – explore our premium turf options
Not sure which turf is right for you? Order free samples to test at home
References
- “How Much Does a Backyard Putting Green Cost? (2025).” HomeGuide, 1 Feb. 2024.
- “How Much Does a Backyard Putting Green Cost? (2025).” HomeAdvisor, 22 Jun. 2025.
- “What are typical PGA Tour green speeds?” Golf News Net, 16 Feb. 2018.
- “High-ROI Home Upgrades: 9 Renovations That Actually Pay Off.” Palm Paradise Realty, 23 May 2025.
- “LED Lighting.” Department of Energy (2025).
- “Every Shot Counts: Using the Revolutionary Strokes-Gained Statistics to Improve Golf Performance & Strategy.” CPG Golf, 2 May 2017.
- “Putting by the Numbers – Part One.” 18Birdies Knowledge Base.
- “The 10 Best Home Improvement ROI Projects of 2023 (According to Experts).” RenoFi, 5 Sept. 2024.
- “USGA Recommendations for a Method of Putting Green Construction.” USGA (2018).