A high-performance backyard turf putting green comes down to three things most guides gloss over: a properly graded and compacted sub-base that won’t shift or pool water, engineered putting turf with the right fiber type and face weight for realistic ball roll, and precision silica sand infill calibrated to dial in the green speed you actually want to practice on. Get those three right and you’ll build a surface that performs in the 9–11 range on a Stimpmeter — the same window most recreational golfers encounter on well-maintained club greens, where a reading of 10 is considered fast but manageable and 11 approaches the speeds maintained by highly rated private clubs. Get any one of them wrong and you’ll feel it on every putt.
This guide covers the full arc: what separates a synthetic putting green that plays like the real thing from one that just looks like it, how to plan and size your green for your specific space, the installation sequence from excavation to first putt, honest guidance on DIY versus professional installation, maintenance realities, cost and value analysis, and advanced features for serious practice. By the end, you’ll have the technical foundation to make informed decisions at every stage — whether you’re building it yourself or directing a contractor.
Key Takeaways
- Three non-negotiable elements determine whether a backyard turf putting green plays like the real thing: a sub-base engineered for stability and drainage, turf fiber selected for realistic ball roll and durability, and silica sand infill calibrated to deliver consistent green speed in the 9–11 Stimpmeter range.
- Nylon fiber is the gold standard for dedicated putting greens — it delivers the firmest, most consistent ball roll and the highest UV and abrasion resistance. Polyethylene offers a balanced middle ground for dual-purpose greens, while polypropylene suits casual use but degrades faster.
- Sub-base compaction to 95% density (per ASTM D698 standards) is the threshold for long-term surface integrity. Drainage failures rank among the most common causes of premature green degradation.
- A functional green needs less space than most people assume — roughly 200–300 square feet for basic practice, with 400–600 square feet as the sweet spot for genuine practice variety.
- DIY is viable for simple, flat greens under 400 square feet on well-drained sites. Professional installation is strongly recommended for larger greens, complex drainage, significant contouring, or landscape-focal projects.
- Maintenance is roughly one hour per month — no mowing, watering, or fertilizing. Proper care delivers a 15-to-20-year lifespan from a single installation.
- Cost is driven by five components: turf material (30–40%), sub-base and drainage (15–25%), infill (5–10%), labor (25–35%), and accessories (5–10%). Synthetic surfaces save substantially over natural bentgrass in annual maintenance and eliminate commute time to practice facilities.
What Makes a Backyard Putting Green Play Like the Real Thing
Drop a ball on a poorly built backyard green and you can feel it immediately — the roll stutters, the break is wrong, the speed changes from one spot to the next. Drop a ball on a well-engineered one and something clicks: it tracks, it holds its line, and the speed is honest. That difference isn’t luck or budget. It’s engineering.
A well-built synthetic green can replicate the speed, break, and ball behavior of a natural bent grass putting surface closely enough that practice translates directly to the course. But “well-engineered” is doing heavy lifting in that sentence. The performance gap between a premium residential green and a cheap one isn’t subtle — it’s the difference between practicing reads and reinforcing bad habits.
Three elements determine whether your green plays real: the turf fiber technology, the infill system controlling speed and ball reaction, and the sub-base underneath everything that dictates long-term surface integrity. Each one is a decision point where cutting corners compounds.
Turf Fiber Technology: Nylon vs. Polypropylene vs. Polyethylene
Run your hand across a sheet of nylon putting turf, then across polypropylene. The difference isn’t just texture — it’s a preview of how the ball will behave on each surface for the next fifteen years. The fiber your green is made from is the single biggest factor in ball roll quality, feel underfoot, and long-term durability.
Nylon is the gold standard for dedicated putting greens. It delivers the firmest, most consistent ball roll and holds up to heavy foot traffic and UV exposure better than any alternative. Nylon fibers maintain their upright position under repeated use — with the highest ratings for strength, resilience, UV resistance, and abrasion resistance among synthetic turf fiber types — which means your green plays the same on putt number one thousand as it does on putt number one. Nylon is also the most heat-resistant turf fiber, with a melting point of approximately 460°F. The tradeoff is cost — nylon turf runs at the top of the price range — and a slightly firmer feel underfoot that some homeowners notice compared to softer fiber types.
Polypropylene sits at the entry level. It’s the softest and least expensive option, and it delivers an acceptable putting surface for casual use. But polypropylene fibers are more susceptible to matting under sustained traffic and degrade faster under intense UV exposure — in its base form, polypropylene can lose significant mechanical strength after relatively brief high-intensity UV exposure, and even with stabilizing additives, it remains more UV-vulnerable than nylon over prolonged outdoor use. For a homeowner who putts recreationally a few times a week, polypropylene can work. For a serious practice green that needs to perform consistently over years, it falls short.
Polyethylene occupies the middle ground and has become increasingly popular for residential greens that serve dual purposes — putting practice and general backyard use. It offers better durability than polypropylene with a softer, more natural feel than nylon. Many of the best residential putting greens use polyethylene blends or nylon-polyethylene combinations that balance performance with comfort.
Regardless of fiber type, two specifications matter most: pile height and face weight. For a dedicated putting surface, you want pile height in the half-inch to three-quarter-inch range — short enough for true ball roll, tall enough for the infill to anchor properly. Face weight — the total weight of fiber per square yard — should fall between 40 and 60 ounces. Heavier face weight means denser fiber coverage, which translates to more consistent ball contact and better long-term durability.
| Fiber Type | Pile Height | Face Weight | Green Speed Range (Stimpmeter) | Best For | Durability |
| Nylon | 1/2″–3/4″ | 48–60 oz | 10–13 | Dedicated practice greens | Highest |
| Polyethylene | 1/2″–3/4″ | 40–56 oz | 8–11 | Multi-use residential greens | High |
| Polypropylene | 1/2″–5/8″ | 36–48 oz | 7–9 | Casual/recreational putting | Moderate |
When you’re evaluating putting green turf options, focus on these specifications rather than brand marketing. The numbers tell you exactly how the surface will perform.
How Infill Controls Green Speed and Ball Behavior
If turf fiber is the engine, infill is the transmission. Silica sand infill is what gives a synthetic green its Stimpmeter reading — that measurable speed that determines whether your green plays slow and forgiving or fast and demanding. Without proper putting green infill, even premium turf fiber produces inconsistent ball roll.
The mechanics are intuitive: infill fills the space between turf fibers, controlling how much of each fiber blade stands above the sand line. More infill buries more fiber, the ball rides higher on the tips, and the green plays faster. Less infill exposes more fiber, creates more friction, and slows things down. This is why infill isn’t a set-it-and-forget-it element — it’s your primary speed adjustment tool for the life of the green.
For residential putting greens, the target Stimpmeter range is typically 9 to 11. Fast enough to replicate competitive course conditions, controlled enough that every putt isn’t an adventure. Achieving that range requires even infill distribution at a consistent depth — careful application and thorough brushing during installation, then periodic topping off as the sand settles over time.
Silica sand is the industry standard for putting green infill and the recommended choice for performance-oriented residential greens. Rounded grains specifically provide the most consistent ball roll because the uniform grain shape creates predictable fiber interaction. Some installers use rubber infill or rubber-sand blends, primarily for multi-use surfaces where cushioning matters more than putting precision. For a dedicated practice green, straight silica sand — like TFD’s putting green silica sand infill — delivers the most controllable, tour-relevant speed.
Fine-tuning speed after installation is done through top-dressing — a thin additional layer of sand or specialized putting green top dressing brushed into the surface to incrementally adjust the Stimpmeter reading. It’s the same principle course superintendents use on natural greens, translated to synthetic surfaces.
Why Sub-Base Engineering Determines Long-Term Performance
Walk across a five-year-old putting green with a failed sub-base and you’ll find the evidence underfoot: soft spots where the aggregate settled, shallow puddles where water has nowhere to go, dips that send every putt offline. The sub-base is arguably the most important component of the entire project — and the one most often shortchanged.
It serves three functions simultaneously. It provides the rigid, stable platform that prevents surface undulations from developing as the ground beneath settles. It manages water so the surface stays playable within minutes of a rainstorm. And it establishes the finished grade — the precise contours and slopes that determine how putts break across the surface.
The standard construction sequence starts with excavation down to stable native soil, typically 6 to 8 inches below your target finish grade. A geotextile fabric goes down first to prevent native soil from migrating into your aggregate layers. Then comes 3 to 4 inches of compacted crushed stone aggregate — your drainage layer. Three-quarter-inch crushed stone is the most common spec because it compacts firmly while still allowing water to percolate through. On top of the aggregate goes a finer layer of crushed stone or decomposed granite, screeded to your final contour profile and compacted to at least 95% density.
That compaction standard — 95% — isn’t arbitrary. It’s the established engineering threshold for subgrade construction, codified in ASTM D 698 (Standard Proctor) testing methods and widely specified across pavement and infrastructure applications. At this density, the base becomes rigid enough that foot traffic, weather cycles, and the weight of the turf and infill system won’t cause settling. Achieving it requires a plate compactor with multiple passes. A hand tamper won’t get you there on anything larger than a doormat-sized patch, which is one of the key reasons sub-base work is where DIY projects most commonly go sideways.
Putting green drainage failures are among the most common causes of premature green degradation in residential installations. When water can’t escape through and away from the sub-base, it pools beneath the turf, erodes the fine aggregate layer, and creates soft spots that telegraph as visible dips in the putting surface. For sites with poor natural drainage — clay soils, low-lying areas, or anywhere water tends to linger — a perforated drain pipe system within the aggregate layer is essential, not optional.
With the science of performance established, the next step is applying it to your specific space.
Planning Your Backyard Putting Green: Space, Layout, and Design
Stand in your backyard with a tape measure and the picture changes fast. That open corner you’ve been eyeing is smaller than you remembered. The grade drops three inches over fifteen feet. The only equipment access runs past the new patio. Planning a putting green on paper is easy. Planning one that actually works in your yard is where the real decisions happen — and where readers exploring golf greens at home consistently find that the best long-term investments begin.
Assessing Your Space: Minimum Dimensions and Site Requirements
A functional putting green needs less space than most people assume, but more space than most people initially allocate. Industry installer recommendations generally place the minimum practical footprint at roughly 200 square feet — enough room for basic putting practice with two to three cup locations. That gives you room for a single cup with 8 to 10 feet of putting distance from multiple angles. It’s tight, but it works for stroke mechanics practice.
For genuine practice variety — multiple cup positions, varying distances, and enough break to develop green-reading skills — the 400-to-600-square-foot range is the sweet spot where investment and return balance, allowing for multiple pin positions, longer putts, and enough contour variation. Serious practice greens with chipping areas and multiple contour zones typically run 500 to 800 square feet or more.
| Green Size | Square Footage | Recommended Use | Cup Placements | Approximate Budget Tier |
| Compact | 200–300 sq ft | Stroke practice, single target | 1–2 cups | Entry |
| Mid-Size | 300–500 sq ft | Full putting practice, moderate breaks | 2–3 cups | Mid-Range |
| Full Practice | 500–800+ sq ft | Multi-target practice, chipping zones, contours | 3–5 cups | Premium |
Beyond raw dimensions, three site factors drive your home putting green design: slope, sun exposure, and drainage. Existing slope is actually an asset if it’s moderate — natural grade gives you break options without extensive earthwork. But anything above 5% across the planned footprint means significant grading to create a playable surface. Sustained shade from trees or structures promotes moisture retention and organic growth on the surface, both of which affect playability. And existing drainage patterns — where does rainwater currently go? — determine whether you need basic grading or a full engineered drainage solution beneath the green.
Don’t overlook access. Aggregate deliveries, turf rolls weighing several hundred pounds, and equipment like a plate compactor or small excavator all need a path to the site. More than a few backyard projects have been redesigned after someone realized the only route in was through a 36-inch garden gate.
Designing Contours, Slopes, and Undulations for Realistic Play
A flat green builds stroke confidence. A contoured green builds course-ready skills. The best residential greens include both — a flat section for dialing in mechanics and contoured zones that teach you to read break and manage speed on sloped putts.
For residential greens, slope percentages between 1% and 3% produce the most useful practice conditions. That translates to roughly one-eighth to three-eighths of an inch of drop per foot of run. A 2% slope across a 10-foot section creates 2.4 inches of total break — enough to visibly move the ball off a straight line and demand adjustment, but not so severe that every putt becomes a gimmick.
The design principle is variety without extremes. Three or four distinct putting zones that present different challenges: a relatively flat approach to one cup, a right-to-left breaker to another, a downhill slider, and perhaps a subtle uphill putt. This variety transforms repetitive practice into pattern recognition training — the same skill you use reading greens on the course.
Cup placement relative to contours matters more than most people realize. Position cups where at least two different approach angles present meaningfully different putts. A cup in the middle of a flat section serves one purpose. That same cup placed where two slopes converge creates six or seven different practice putts depending on where you set the ball.
Integrating the Green with Your Existing Landscape
The fastest way to make an otherwise excellent putting green look like an afterthought is to drop it into the yard with hard edges and no transition. If the green’s appearance matters as much as its performance — and for many homeowners investing at this level, it does — landscape integration deserves the same attention as sub-base engineering.
Edging defines the visual boundary and should match your existing hardscape vocabulary. Natural stone borders pair with flagstone patios and rustic landscaping. Concrete curbing suits modern, clean-lined properties. Flush-cut transitions — where synthetic turf meets natural grass at the same grade with a buried edge — create the most seamless look but require more precise installation and ongoing edge maintenance.
Fringe turf is one of the most effective integration tools and doubles as a practice surface. A 2-to-4-foot border of slightly taller, different-textured turf around the putting surface mimics the fringe on a real green and creates a natural visual transition to the surrounding landscape. It also gives you a realistic chipping and approach surface if you expand the practice area later.
Avoid the “green island” effect — a rectangle of bright synthetic turf floating in the middle of a natural lawn. Nestle the green against existing landscape features: a retaining wall, a garden bed, a patio edge. Low ornamental grasses and groundcovers frame the perimeter without dropping excessive debris onto the surface. For design approaches that tie the practice area into a cohesive backyard layout, explore backyard chipping green ideas for configurations that integrate short game features with landscape design.
Once the plan is set and the design decisions are final, the physical work begins — and the installation sequence matters as much as the materials you chose.
Putting Green Installation: From Ground Prep to First Putt
Every step in installation depends on the one before it. Rush ahead or skip a step, and the problems compound — most of them invisible until months after the project looks finished. The process breaks into four stages: clear and grade the site, build the drainage layer and sub-base, lay and secure the turf, then apply infill and calibrate speed.
For the comprehensive step-by-step walkthrough with detailed tool lists and time estimates, our guide on how to install a putting green in your backyard covers the full process. What follows is the critical-path overview — the decisions and standards that determine success or failure at each stage.
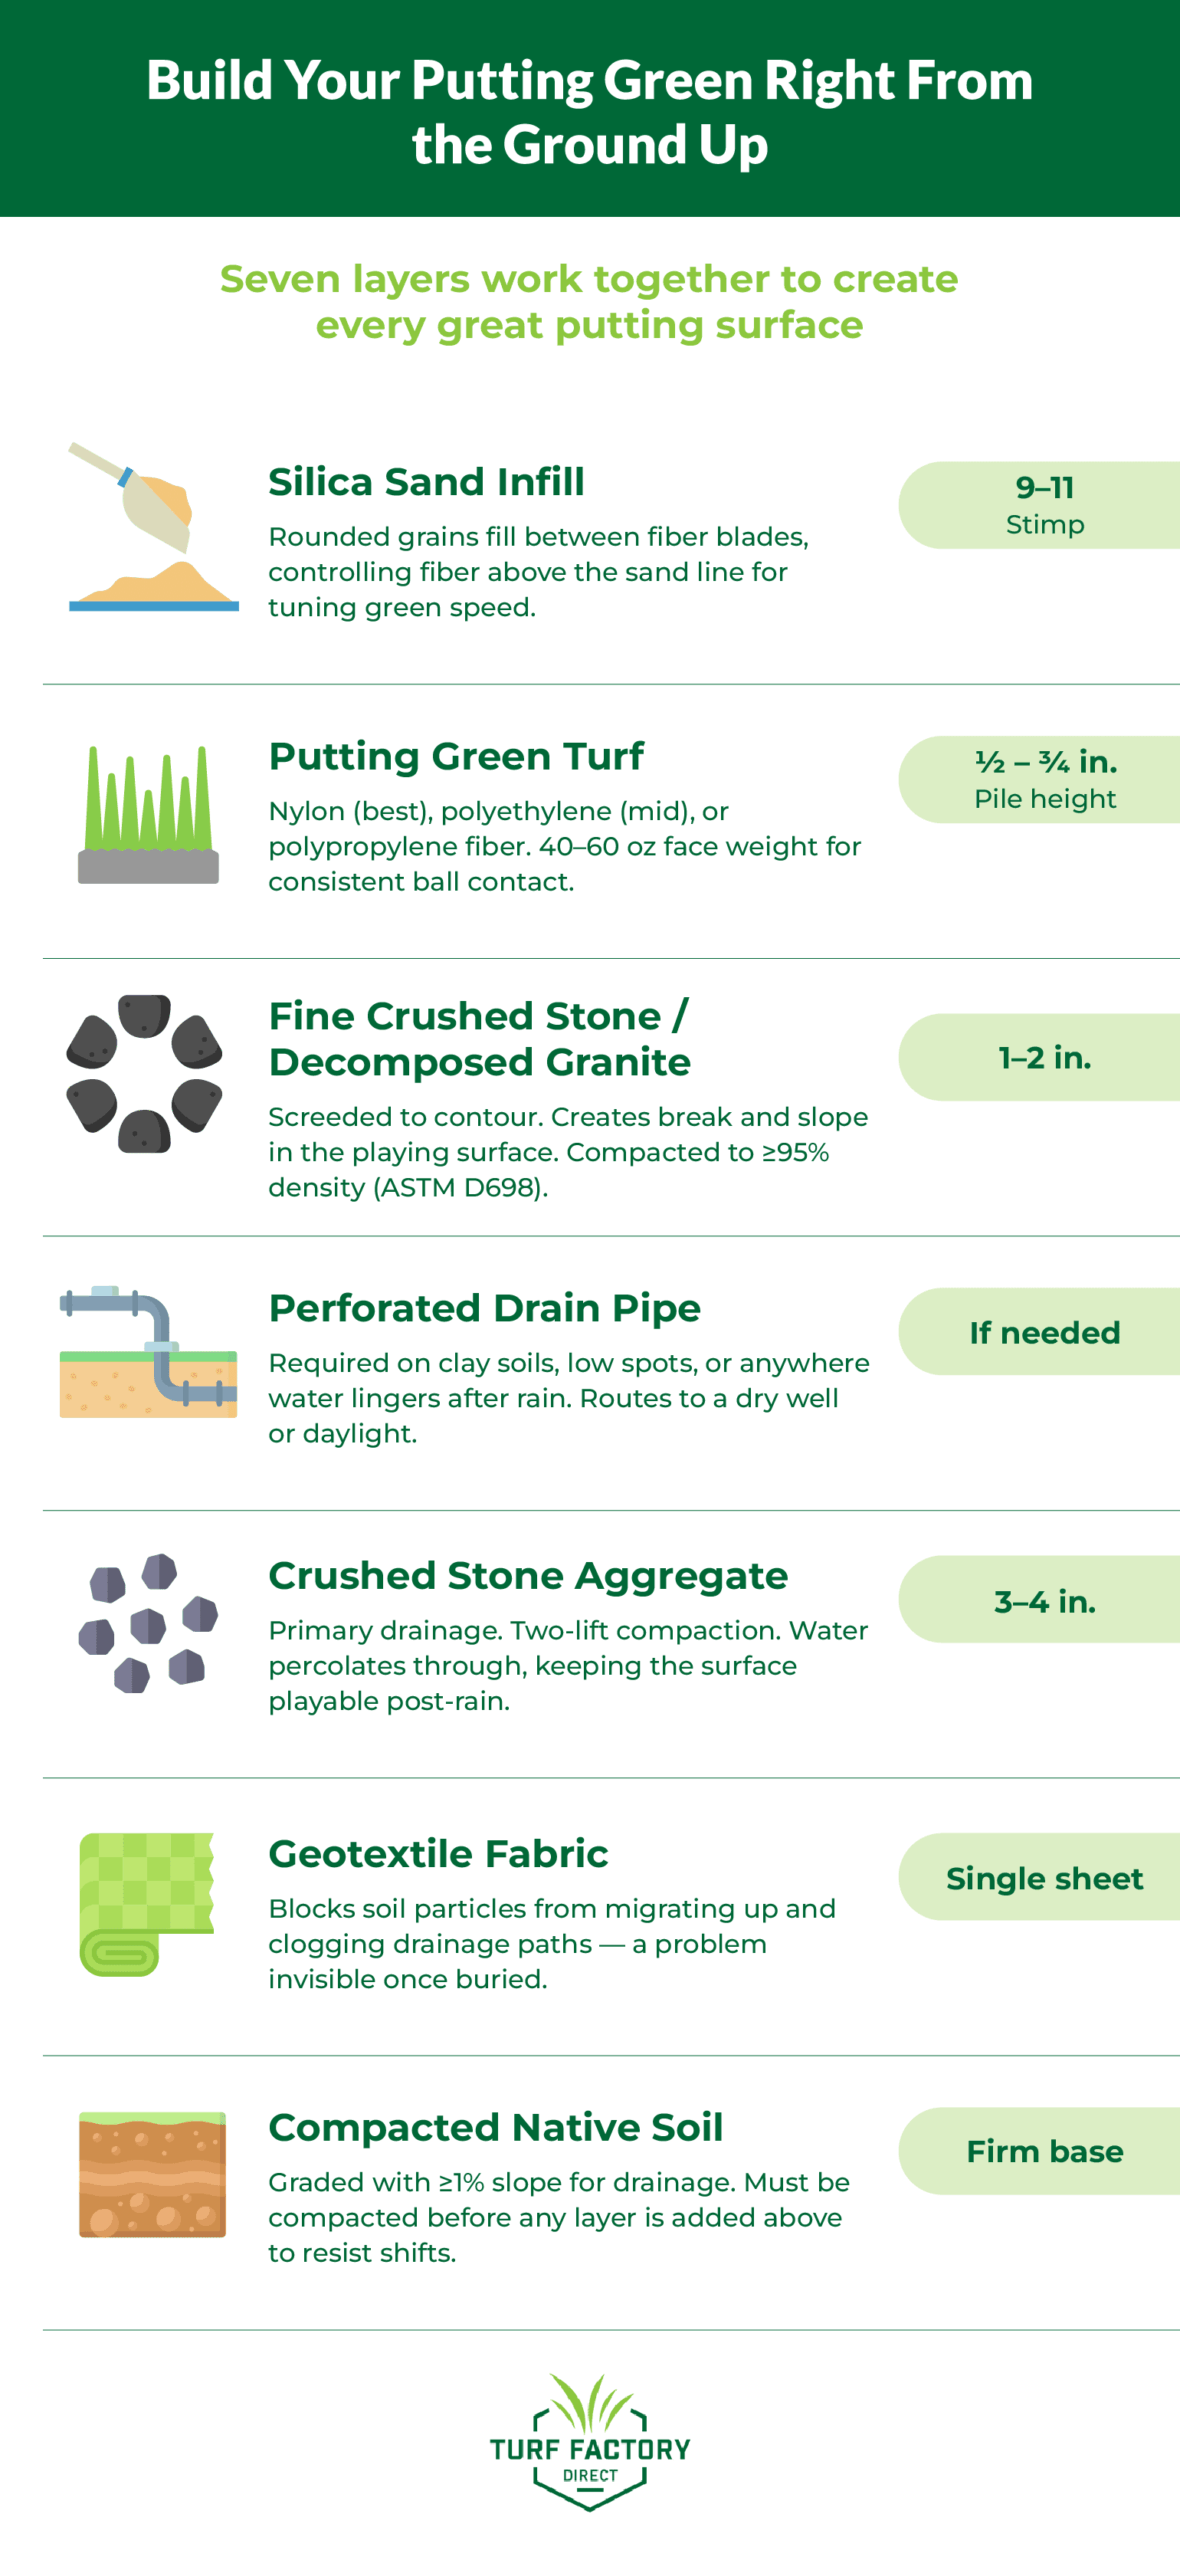
Cross-Section (top to bottom):
- Silica sand infill — calibrated for target green speed
- Putting green turf — secured at perimeter
- Fine crushed stone / decomposed granite (1–2″) — contour layer, screeded and compacted
- Perforated drain pipe — if site drainage requires it
- Crushed stone aggregate (3–4″) — drainage and structural base
- Geotextile fabric — separation and stabilization
- Native soil — compacted, graded for drainage
Site Clearing, Grading, and Compaction
Strip all existing vegetation, topsoil, and organic material from the project area. Organic matter beneath a putting green is a time bomb — it decomposes, compresses unevenly, and creates surface dips that no amount of surface repair can permanently fix.
Excavate to a depth of 6 to 8 inches below your planned finish grade. This gives you room for the aggregate drainage layer, the fine base layer, and the turf system itself. Grade the excavated surface for drainage with a minimum 1% slope away from any adjacent structures — roughly one-eighth inch per foot of run. This drainage grade is separate from the putting surface contours you’ll build into the fine base layer above.
Compact the native soil before adding anything on top of it. This step is often skipped in DIY projects and it’s one of the most consequential shortcuts you can take. Uncompacted native soil shifts seasonally — freeze-thaw cycles, moisture changes, and simple settling will telegraph through every layer above it.
Building the Drainage Layer and Sub-Base
Lay geotextile landscape fabric across the compacted native soil. This prevents native earth from migrating upward into your aggregate layer and clogging drainage paths — a problem that’s invisible and irreversible once the green is installed.
Spread 3 to 4 inches of crushed stone aggregate (three-quarter-inch sizing) and compact in lifts — compact the first 2 inches, add the remaining aggregate, compact again. Single-pass compaction on a thick aggregate layer won’t achieve uniform density throughout the depth.
For sites with poor natural drainage — clay-heavy soils, low spots, or any area that holds standing water for more than an hour after moderate rain — install a perforated drain pipe system within the aggregate layer before the final compaction. Route the drains to a suitable discharge point: a dry well, a storm drain connection, or daylight at a lower grade. This isn’t overengineering. It’s the difference between a green that’s playable thirty minutes after a downpour and one that’s spongy for days.
Top the aggregate with 1 to 2 inches of fine crushed stone or decomposed granite. This is the layer you’ll screed to your final contour profile — the slopes, breaks, and undulations that define your putting surface. Take your time. Every contour decision is permanent once the turf goes down. Compact this finishing layer to 95% density or higher using a plate compactor with systematic, overlapping passes.
Laying, Seaming, and Securing the Turf
Unroll the turf across the prepared base and allow it to acclimate — installers typically recommend several hours, longer in cooler weather. Turf ships compressed in a roll, and the fibers and backing need time to relax and flatten. Cutting, seaming, or securing turf that hasn’t fully relaxed guarantees wrinkles and buckles that become permanent once infill is applied.
Trim to your green’s perimeter shape, leaving an extra inch on all edges for final fitting. For greens requiring more than one piece of turf, seaming is often the most skill-intensive step in the process. The seam must be invisible — fibers from both pieces meeting with no visible gap or overlap. This requires seam tape, adhesive, and careful alignment of fiber direction on both pieces. A visible seam isn’t just cosmetic; it’s a ridge that deflects every ball that crosses it.
Secure the perimeter with landscape spikes or staples every 4 to 6 inches. Along edges where turf meets hardscape, use adhesive or a tucked-edge method to prevent lifting. Install cups and flagsticks last — cut the cup holes after the turf is secured but before infill locks fiber position in place.
Infill Application and Speed Calibration
Spread silica sand infill evenly across the entire surface using a drop spreader. Even distribution is non-negotiable — heavy spots create slow zones, light spots create fast streaks. Apply in multiple thin passes rather than one heavy application, brushing with a stiff-bristle broom or power brush between passes to work the sand down between fibers.
For most residential greens targeting that 9-to-11 Stimpmeter range, experienced installers recommend infill sitting roughly one-eighth to one-quarter inch below the fiber tips — just enough exposed fiber for consistent ball contact without excessive friction. Use TFD’s silica sand infill applied in incremental layers, testing ball roll after each pass until you reach your target speed. TFD’s putting green top dressing gives you additional fine-tuning capability once the base infill is established.
Test your green speed with a Stimpmeter if you have one, or use a simple ball-roll test: release a ball from a consistent height — a clipboard angled at approximately 20 degrees replicates the USGA’s official Stimpmeter release angle — and measure roll distance. Consistency across different areas of the green matters more than the absolute number — uniform speed confirms the infill is evenly distributed.
Don’t call the project complete until you’ve tested from multiple positions and confirmed the surface plays consistently. This final calibration determines whether all the work underneath translates into a practice surface worth the investment.
DIY vs. Professional Installation: Making the Right Call
This decision comes down to honest self-assessment, not ego. A skilled DIYer with the right equipment can absolutely build a functional putting green. But the margin for error is thinner than most home improvement projects, and the consequences of mistakes are more expensive to fix — because they’re buried under the finished surface.
What a Skilled DIYer Can Handle (and Where Most Get Stuck)
The DIY-friendly portions: site clearing, basic grading on relatively flat ground, turf layout on simple shapes, and infill application. If your plan is a rectangular or gently curved green on a reasonably flat site with decent natural drainage, a competent DIYer with a plate compactor, a level, and a rented sod cutter can handle the build over two to three weekend days for a 200-square-foot green.
Where DIY putting green projects most commonly fail:
- Compaction. Achieving 95% base density requires a plate compactor used systematically. Hand tamping, rolling with a lawn roller, or “just driving over it a few times” leaves soft spots that surface as dips within the first year. You can’t eyeball compaction. You either hit the standard or you feel the consequences.
- Drainage engineering on problem sites. If your site has drainage concerns — clay soil, a low spot, slope toward a structure — the drainage system design and execution is critical infrastructure, not a DIY guess. Water damage to a sub-base is progressive and irreversible without tearing out the green entirely.
- Seaming on complex shapes. Curves, cutouts around landscape features, or any configuration requiring multiple turf pieces — seaming quality is a make-or-break skill. A bad seam is visible from 20 feet away and gets worse over time as the edges curl.
- Contour grading. Building slopes and undulations into the fine base layer requires screeding skills and patience. Flat greens are straightforward. Contoured greens demand a level of precision that most DIY grading experience doesn’t prepare you for.
When Professional Installation Is Worth the Investment
Professional backyard putting green installation is strongly recommended for greens over 400 square feet, sites with complex drainage requirements, designs with significant contouring, and any project where the green serves as a focal landscape feature.
Think of the labor cost as insurance on a material investment that starts at several thousand dollars and can exceed fifteen thousand on larger, premium projects. A professional installer brings plate compaction equipment, laser grading tools, and — most importantly — the pattern recognition that comes from having built hundreds of greens. They know what 95% compaction feels like, what a drainage problem looks like before it becomes one, and how to make a seam disappear.
Whether you’re going DIY or professional, evaluating turf material firsthand before committing is worth the small investment. Ordering putting green samples lets you compare fiber types, pile heights, and face weights with the turf in your hands rather than trusting descriptions on a screen.
Once the green is installed, the priority shifts to keeping it performing.
Putting Green Maintenance and Seasonal Care
A quality synthetic putting green requires roughly one hour of maintenance per month. No mowing, no watering, no fertilizing, no aerating, no fungicide treatments. But “low maintenance” doesn’t mean “no maintenance,” and the tasks you do perform directly impact how long the green plays at a high level.
Routine Maintenance: Weekly and Monthly Tasks
Weekly (5–10 minutes): Brush the turf fibers upright with a stiff-bristle broom or specialized turf brush. This redistributes infill displaced by foot traffic and prevents fiber matting. Brush in varying directions — always sweeping the same way creates a grain pattern that affects ball roll. Clear leaves, twigs, and debris from the surface.
Monthly (20–30 minutes): Inspect infill levels across the entire surface. Thin spots feel noticeably softer underfoot and produce slower ball roll. Top up as needed. Check all seams for lifting or separation, especially at high-traffic transition points. Rinse the surface with a garden hose to flush dust, pollen, and pet-related residue — in warmer months, this also reduces surface temperature.
| Task | Frequency | Time | Tools |
| Brush fibers upright | Weekly | 5–10 min | Stiff-bristle broom or turf brush |
| Clear surface debris | Weekly | 2–5 min | Leaf blower or hand rake |
| Inspect infill levels | Monthly | 10 min | Hands and eyes — feel for soft spots |
| Check seam integrity | Monthly | 5 min | Visual inspection |
| Rinse surface | Monthly | 10 min | Garden hose |
| Top up infill | As needed (quarterly typical) | 15–20 min | Drop spreader, stiff brush |
Seasonal Protection: Extreme Heat, Cold, and Moisture
Heat. Synthetic turf surfaces absorb significantly more heat than natural grass. Research from Penn State University’s Center for Sports Surface Research measured synthetic turf surface temperatures ranging from 107°F on moderate days to upward of 160°F on hot, sunny days — with infill systems reported even higher under extreme conditions. For most residential putting greens, expect surfaces in the 120°F to 150°F range during direct summer sun. A light misting with a garden hose before practice drops the temperature fast and evaporates quickly on a well-drained green. Lighter-colored turf products reflect more heat — worth factoring into fiber selection if you live in a hot climate.
Cold. Synthetic greens are playable well below freezing — the ball actually rolls faster on cold, firm turf, making winter sessions excellent speed training. Remove snow with a plastic shovel or soft-bristle push broom. Never use a metal shovel, and never apply salt or chemical ice melt — salt can clog the drainage holes in the turf backing and compromise the drainage system, while chemical products can leave residues that affect the surface and potentially harm pets. For freeze-prone climates, ensure your drainage system has adequate discharge capacity and isn’t routed where ice dams could form at the outlet.
UV exposure. Quality putting green turf includes UV stabilizers in the fiber composition to resist fading and material degradation. Even so, years of full-sun exposure will gradually affect appearance. This is one of the real-world differences between premium and budget turf: industry estimates suggest entry-level products may show noticeable fading sooner, while premium nylon and polyethylene fibers — with their superior UV resistance — maintain color and structural integrity significantly longer.
For deeper guidance on selecting turf materials according to your climate, see outdoor putting green turf considerations that expand on this topic.
Extending Turf Lifespan: Damage Prevention and Repair
The enemies of turf longevity are concentrated heat, sharp objects, and heavy static loads. Keep grills, fire pits, and smoker exhausts well away from the putting surface — a single ember melts a permanent mark into synthetic fiber. Don’t drag heavy furniture across the green. If you place anything on the surface temporarily, move it within a day to prevent compression marks in the fibers.
Minor damage is repairable. Small burns or tears can be patched by cutting out the damaged area and seaming in a replacement piece — keep a remnant from your original installation for exactly this purpose. Lifted seam edges get re-adhered with seam tape and adhesive. Spot-thin infill gets topped up during regular maintenance.
Schedule a professional surface inspection annually — twice a year if you practice daily. An experienced eye catches early signs of base settling, drainage degradation, and seam issues before they escalate to full repairs. With proper care, a quality artificial turf putting green delivers 15 to 20 years of performance. That’s thousands of hours of practice from a single installation.
That durability — and what it takes to achieve — frames the financial picture.
Cost and Value: What to Budget and What You’ll Gain
Search for putting green costs online and you’ll find numbers ranging from “a few hundred dollars” to “fifty thousand” — technically true, practically useless. The meaningful cost analysis breaks down by component, scales by project size and complexity, and frames the investment against what it replaces.
For a comprehensive pricing breakdown with current material cost ranges, this putting green turf cost guide provides a detailed analysis. What follows is the structural framework for understanding what drives your budget.
What Drives Project Cost: Materials, Size, and Complexity
Five components make up the bulk of any putting green budget, and their relative weight shifts with the project:
- Turf material typically represents 30–40% of total cost. Pricing varies significantly by fiber type and face weight. Higher face weight and density cost more per square foot but deliver better performance and longevity — making the cost-per-year calculation more favorable on premium products.
- Sub-base materials — aggregate, fine stone, geotextile fabric — account for roughly 15–25%. This percentage climbs on sites requiring engineered drainage, heavy excavation, or soil remediation.
- Infill is a modest component, typically 5–10% of the total, but it’s a recurring cost — infill levels need periodic replenishment over the life of the green.
- Labor (for professional installation) represents 25–35% of the budget. This is the line item DIY projects eliminate — though as covered above, the skill requirements for proper installation are significant.
- Accessories and finishing — cups, flags, edging, landscape integration — round out the remaining 5–10%.
| Component | % of Budget | Key Variables |
| Turf material | 30–40% | Fiber type, face weight, square footage |
| Sub-base & drainage | 15–25% | Site conditions, drainage complexity, excavation depth |
| Infill | 5–10% | Green size, target speed, material type |
| Labor (if professional) | 25–35% | Project complexity, regional rates, contour difficulty |
| Accessories & finishing | 5–10% | Cups, flags, edging, landscape integration |
General budget tiers — wide ranges, because regional material costs, site complexity, and labor rates vary enormously:
- Entry tier (basic flat green, ~200 sq ft, DIY): Lowest investment point, suited for casual practice.
- Mid tier (contoured green, ~400 sq ft, semi-professional install): Where most serious recreational golfers land.
- Premium tier (custom green, 600+ sq ft, full professional with advanced features): A comprehensive practice facility.
Long-Term Savings vs. Natural Grass and Club Memberships
The ongoing cost comparison favors synthetic surfaces heavily. According to the USGA’s Green Section Record, a natural bentgrass putting green costs $18 to $20 per square foot in materials alone, requires a dedicated irrigation system, daily watering, and mowing four to six times per week. Annual maintenance for natural bentgrass can rival the annual amortized cost of the synthetic green’s total installation — with industry estimates placing natural surface upkeep at $500 to $1,500 per year (excluding equipment and irrigation), compared to less than $100 annually for a synthetic green.
The sharper comparison for the committed golfer is against time. If you’re driving 30 to 45 minutes to a practice facility three to five times per week, that’s 3 to 7.5 hours weekly just commuting — 150 to nearly 400 hours per year. Add driving range fees, practice green access, or the putting-relevant portion of a club membership, and the backyard golf green’s cost-per-session over a 15-to-20-year lifespan becomes remarkably favorable.
Property Value and Buyer Appeal
A well-designed residential putting green enhances property value — but the magnitude depends on market, quality, and integration. In markets where affluent buyers value outdoor living amenities, a putting green functions in the same tier as a pool, an outdoor kitchen, or a sport court: a lifestyle feature that can differentiate a property and support premium pricing.
The operative phrase is “well-designed and professionally integrated.” A green that reads as a natural extension of the landscape adds perceived value. One that looks like a roll of carpet dropped in the yard does the opposite. The investment in landscape integration, proper edging, and complementary plantings is what separates a feature that excites a future buyer from one they mentally earmark for removal.
If your performance requirements are set and your budget framework is clear, the remaining question is what elevates a good green into a serious practice facility.
Advanced Features for Serious Practice
Everything above builds a putting green that performs. The features below separate a green you practice on from a facility that accelerates improvement — additions serious golfers recognize as the difference between hitting balls and actually training.
Chipping Areas, Fringe Zones, and Multi-Surface Practice
A putting green in isolation trains putting. Add a chipping zone and you’ve built a short game complex covering the scoring shots that, according to research by the late Dave Pelz — former NASA physicist and widely regarded short-game authority — account for 60 to 65% of all golf shots taken inside 100 yards of the hole.
Chipping areas use a different turf type — taller pile height (typically 1 to 1.5 inches), a different fiber that mimics fairway or rough texture, and a different infill depth that lets the club interact with the surface the way it would on natural turf. Position the chipping zone adjacent to the putting green with a realistic fringe transition between them. This creates approach shots that start on fairway-like turf, cross a fringe, and release onto the putting surface — the same sequence you execute on the course.
Fringe turf — that 2-to-4-foot border of medium-pile turf surrounding the green — serves double duty: landscape integration and a realistic surface for delicate bump-and-run shots where feel matters more than power.
For configurations that maximize practice variety in limited space, explore backyard chipping green ideas that integrate short game features with landscape design.
Adjustable Slopes, Multiple Cups, and Speed Variation
A practice green with one cup and one speed setting is a practice green you’ll outgrow in six months. Design for variety from the start.
Multiple cups — three is the minimum for serious practice — should create distinct challenges relative to your green’s contours. One on a flat section for distance and speed control work. Another where two slopes converge, producing breaking putts from multiple angles. A third demanding uphill or downhill approach putts. This simple three-cup layout generates a dozen meaningfully different putts depending on your starting position.
Speed variation turns a single-condition surface into a versatile training tool. By adjusting infill depth through putting green silica sand infill or putting green top dressing, you can shift the Stimpmeter reading to simulate different course conditions. Practice on a 9 one week and an 11 the next — the adaptability builds touch and speed control that transfers to any green you face on the course.
Modular slope systems let you change the contour profile periodically. These sub-surface forms adjust the grade beneath the turf to create different break patterns without modifying the base construction. A premium add-on, but for the golfer who treats practice with the same discipline as a training regimen, they eliminate the plateau effect of reading the same breaks every session.
Lighting for Nighttime Practice
For the working professional who benefits most from a backyard green but has the least daylight to spare, lighting extends the practice window by hours. In northern climates during fall and winter, it can mean the difference between practicing three times a week and not practicing at all.
LED landscape lighting designed for sports surfaces provides even illumination without harsh shadows that distort green reading. Standard landscape lighting practice suggests positioning lights at the green’s perimeter, angled inward at roughly 30 to 45 degrees — this minimizes shadow casting from your body and the flagstick. Avoid overhead lighting, which pushes shadows directly downward and erases the visual break cues you need for realistic practice.
The investment is modest — typically a few hundred dollars for a quality LED system — and the return is disproportionate. A golfer who gains 45 minutes of weekday evening practice finds lighting pays for itself in added sessions within the first few months.
Building a Green That Earns Its Place in Your Backyard
A backyard turf putting green that genuinely improves your game starts where every great practice facility does: below the surface. The sub-base engineered for stability and drainage, the turf fiber matched to your performance goals, and the infill calibrated for consistent, tour-relevant speed — these three elements account for virtually the entire performance gap between a residential green worth practicing on and one that’s an expensive yard ornament. A modest green built on a proper foundation will outperform a large one built on shortcuts every time.
The critical path is sequential and unforgiving: engineer the sub-base first, select turf fiber and infill as a matched system, and invest the time in proper installation — whether that’s your own careful work or a professional’s experienced hands. Skip nothing. Every shortcut surfaces eventually, and each one costs more to fix than it saved.
Browse our putting green turf collection to evaluate fiber types, face weights, and specifications against the framework outlined above. If you want to feel the difference between fiber types before committing, order putting green samples to compare quality with the product in your hands. The best decision you’ll make in this process is an informed one.