Originally posted on September 1, 2022
Each homeowner dreams of having a flawlessly smooth, vibrant green lawn that all the neighbors admire. But creating this stunning lawn requires more than simply selecting and laying the turf, and tidying the edges. Comprehensive preparation and proper installation are essential for maintaining its beauty over time.
When done poorly, the result can be unsightly and embarrassing. Who wants a lawn filled with creases, folds, and lines where the infill is visible? No one. A professionally done installation looks much better, but DIY is also doable. Preparation and planning are the key ingredients to a nice-looking, low-maintenance lawn.
Read on for more on preventing and removing lines and creases on turf. But first, how do the creases come about before installation?
Causes of Lines and Creases Before Installation
The product you begin with has a lot of bearing on the final look of your turf. If you start with wrinkly turf, you will end up with a creased lawn. Even the best turf can wrinkle during transit or packaging. Quality turf is especially susceptible to creases due to its thickness and suppleness.
Turf is packaged by rolling it around hard cardboard or plastic tubes. If the board is dented or breaks, the result is wrinkled turf. Before installation, rolling out helps to return it to its original form.
If irregular areas form on your new lawn grass, the following steps will help straighten it.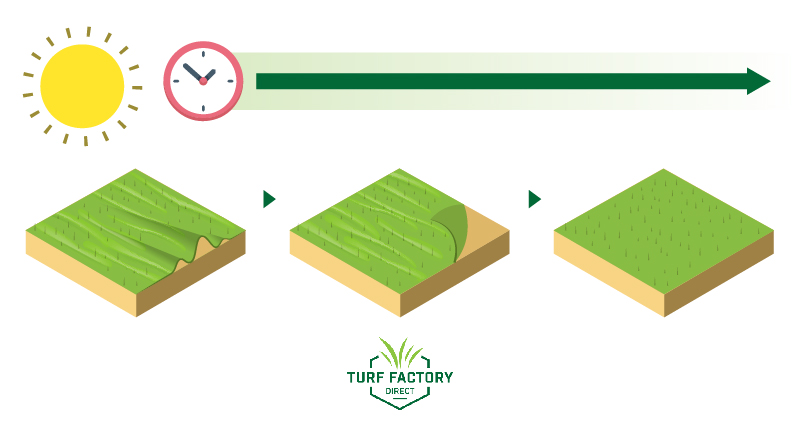
5 Steps Homeowners Should Take To Prevent Creases Before Installation
Before installation, you can take the following steps to prevent creases and ugly folds from forming on your beautiful lawn.
- Creases are usually not a manufacturer’s defect and can happen during manufacturing, transportation, or installation. It is even worse when dealing with poor-quality turf. To achieve the lawn of your dreams, start your project by ordering turf from the best in the industry, Turf Factory Direct.
- Brush them out before you begin your installation for an even lawn.
- Pull out irregular areas, especially close to the edge, to straighten them out. Once you do this, wait 20 minutes for the grass to bounce back. If the wrinkles persist, flip it and pull again on the backing.
- Acclimatizing the fake turf ensures creases will not form during installation. During the warm seasons, simply roll out and leave for 24 hours. But in winter, you need to give it more time—48 hours minimum to ensure it goes back to its original pre-packing form. Artificial turf contracts and expands depending on current temperatures. Before installation, warm it using a heater or heat gun to make it easy to work with and expand it.
- A hurriedly installed lawn will almost always have issues. But if well done, it can last decades. If you take care of your turf and exercise patience during installation, you will have the most beautiful artificial turf.
13 Critical Tips for Eliminating Lines During (& Sometimes After) Installation
These tips will help you deal with lines during installation.
- Once you lay your turf flat on-site, use a power or hand broom before filling. It pushes the blades upright to give them a lush appearance.
- Carefully look at the grass to ensure all blades face the right direction. If patches face different directions, it makes the seam joints more visible. Although not a rule of thumb, install them facing towards the house.
- To prevent visible joints and creasing, ensure the ground is leveled before work begins.
- Finish all the prep work before you make any cuts. Take a step back and ensure all is in place before you take the irreversible step.
- The correct type of infill for your type of turf is crucial to its appearance, as is the quantity you choose. Go with the manufacturer’s recommended amounts for best results.
- Evenly distribute the infill to achieve a level lawn. If some places are more weighed down, joints may become more visible.
- One of the best ways to prevent visible joints is by properly positioning seams. Set up the rolls to ensure the edges align and butt up to prevent gaps. When cutting the turf, match the gauge for perfect seams.
- You will need tape in addition to the adhesive. The tape has a smooth and rough side. The smooth side faces down, while the rough side accommodates the adhesive and should always face up. Interchanging the sides causes droopy glue that doesn’t dry well. As a result, the turf doesn’t hold, and the joint becomes visible. Use just the right amount of glue—too much and it does not dry properly, while too little doesn’t bond the turf.
- Avoid drainage problems by preparing the base before installation. Use rabble for smooth drainage and avoid clay or granite dust under your turf. You have to be especially careful with non-porous surfaces like concrete.
- If you are using nails or spikes to fix your fake turf, be careful to prevent divots from forming. Allow the nail head to pass through to the backing by spreading the fibers. Nails lead to manipulation of the artificial grass. And if the spacing between them is not right, the seam will be visible.
- Ensure the grass is taut when being secured. Otherwise, once it expands, its seams will become visible in addition to creating bumps on the lawn.
- Issues with the edges and corners may result in creasing elsewhere on your lawn and can ruin your landscaping efforts. Secure the edges and corners as lifting can become a hazard.
- Should creasing and visible lines appear after you are done installing, you can try the heat and weight rollers to try and flatten the turf. It is not guaranteed to work, and the best method for a crease-free turf is getting expert turf installers to help you.
Conclusion
When you plan and prepare before installation, you prevent creases and lines from forming. Take time to inspect your work after every step to catch mistakes early. Prepare the site in advance. Once you get your turf, unroll and lay it to acclimatize it. Before cutting and applying adhesive, work on the creases. Once you are sure it is laying perfectly, you can cut and glue it.
If all these seem too much, at Turf Factory Direct, we have all you need and experts to install a nice-looking lawn. Get in touch with us or browse our products on the best turf and related items.